
 I Want to Build a 3-Element Yagi
Because our purpose has been to look at the basic electronic design aspects of the 3-element Yagi, we have omitted structural details. We shall also bypass matters of supporting and rotating the antenna, even though they involve some interesting facets of horizontal antenna performance at various heights above ground. Most of these items are relevant to almost any horizontal antenna, and we wish to remain focused on the 3-element monoband Yagi.
One detail that we dare not overlook is the method of feeding the Yagi. Actually, the term "feeding" is a bit of a misnomer, since it involves the establishment of an impedance match between the antenna and the main feedline. We shall assume that the main feedline is a standard 50-Ohm coaxial cable. (You may, of course, feed the Yagi with any parallel feedline, using an antenna tuner at the shack end of the line. This would permit use of the antenna on many bands, although directional characteristics would be optimal on only one band. However, some remnant directivity may exist on bands adjacent to the one for which the Yagi is designed.)
Feeding the wide-band designs is simplicity itself. To attenuate common mode currents, a choke or 1:1 choke balun is recommended at the antenna feedpoint. Designs ranging from 1:1 toroidal baluns to ferrite-bead baluns to a coil of coax sized for the band in use appear in the standard references, such as the ARRL Antenna Book.
Feeding the high-performance beams we have surveyed is another matter entirely. For these designs, the antenna feedpoint impedance ranged from 20 to 30 Ohms. All of the driven elements were set to resonance, but we can make any adjustments necessitated by the type of matching system we use. Changing the length of a driver by 2 to 3% makes no operational difference in the antenna performance, although it may change the resistive component of feedpoint impedance by a few Ohms. However, it will be the change in the reactive component of the feedpoint impedance that will be most critical to adjusting the matching system.
One common criticism of using matching networks with Yagis is that they introduce losses. However, calculations show that with reasonable care in design, these losses no where exceed 2% of the applied power, a loss of only about 0.08 dB. By contrast, most 3-element Yagi designs that do not need a matching network have gains that are near to or exceed 1 dB lower than those of the high-performance designs. Hence, the use of a matching system should not be considered a negative aspect of a design, so long as the feedpoint impedance does not go too low. Good construction and maintenance practice is, of course, assumed in this note.
Tees and Gammas
Two related forms of feeding a Yagi and at the same time elevating the feedpoint impedance to 50 Ohms are the Tee and the Gamma. (The "Tee" is actually named the "T" for its shape, but adding the "ee" ensures that the single letter is not missed by the reader.) Both methods of feed permit the direct physical and electrical connection of the driven element to the boom.
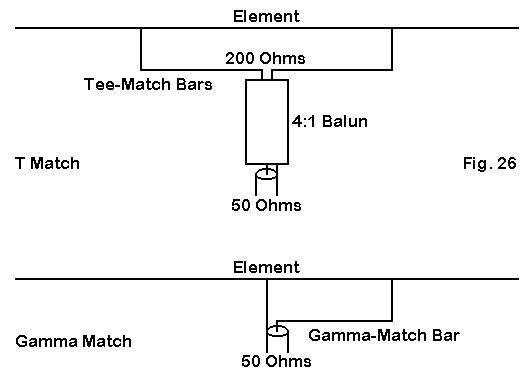
As Fig. 26 shows, we make our feedline connection to a rod or double rod that parallels the element for a distance, at which point we connect a shorting strap to the rod and the element. The gamma match permits a direct conversion of the antenna feedpoint impedance to 50 Ohms. In the gamma match, the coax braid is connected directly to the electrical center of the element.
The Tee double rod system is most effective in raising the impedance to a much higher value than 50 Ohms. 200 Ohms is a convenient value, since a 4:1 balun then provides a fine 50-Ohm match, while performing the task of attenuating common mode currents at the same time.
In VHF beams, many builders have noted and measured some pattern distortion with the gamma match. Hence, the Tee has almost become a standard for beams having other than a 50-Ohm feedpoint impedance. HF beam makers have more confidence in the gamma match, whose parts are a relatively smaller proportion of the driver structure than they are at VHF and UHF. However, the Tee is inherently balanced.
The dimensions of both matching systems depend upon the relative sizes of and the spacing between the element and the rod material. Calculations are best done with software specifically designed for the task. YO (Yagi Optimizer), by K6STI, for example, has such auxiliary software, and independent utility calculation programs are available as freeware from many sources.
Note that the sketches in Fig. 26 did not include a series capacitor at the feedpoint and rod junction, a standard feature in many basic system sketches. In most instances, variable capacitors do not withstand well the rigors of weather. Moreover, the reactance of the system can be set (or nulled, depending upon one's perspective) by adjusting the length of the driven element.
The Beta Match
If you are willing to use a driven element that is insulated from the boom, matching networks become very much simplified. Let's begin with the beta match. Many hams distrust the beta match because the small "hairpin" they see across the feedpoint looks like a short circuit. They just do not understand how the beta match works.
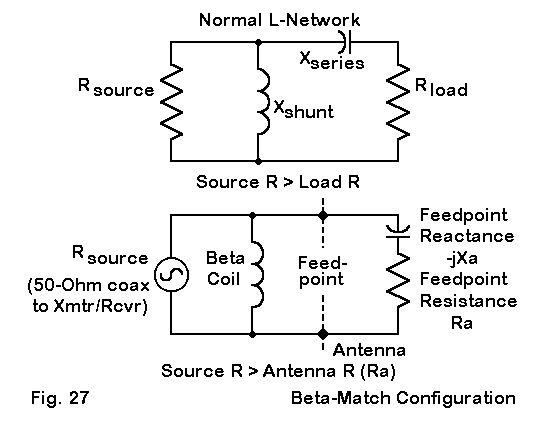
In Fig. 27, we see a common L-network to match a source impedance that is high to a load impedance that is lower. One way to accomplish this is the place a shunt (or parallel) inductor across the source and add a series capacitor to the load. The network arrangement assumes that both the source and the load impedance are purely resistive.
The equations for calculating the proper values for an L-network are very simple. First, let's calculate delta, a figure of "merit" (sometimes called network Q) for the proposed network. For this purpose, we can use the equation

where Rs is the source resistive impedance and Ra is the load resistive impedance. As noted., Rs is higher than Ra. From delta and the values for Rs and Ra, we can calculate the reactances of the shunt and series components of the network:

Xa, the series reactance, can be converted into a value of capacitance for the design frequency, although we shall not have to do this in our application. The value designated as Xl gives the reactance the shunt component. In principle, we can use a series inductor and a parallel capacitor as easily as we might use as series capacitor and a shunt inductor. In most, but not all, antenna applications, the series capacitive reactance and shunt inductive reactance is more usual--and is most apt to our 3-element high-performance Yagi designs.
As the lower part of Fig. 27 indicates, we can obtain the series capacitive reactance without using a separate capacitor. We simply shorten the driven element which changes the resonant resistive feedpoint impedance to a complex value having a capacitive reactance component. How much do we shorten the element?
The answer to this question has two parts. First, we need to know what amount of series capacitive reactance we need. If we assume that Rs is 50 Ohms, the characteristic impedance of our main feedline and the transmitter connected to it, then we can calculate the required value of both the series and the shunt reactances. Since all of our beams had feedpoint impedances between 20 and 30 Ohms, we can reduce the problem to a little chart.
Load Res.                     Source Resistance, Rs = 50 Ohms
  Ra (Ohms)                   30             25             20
delta                         0.817          1.0            1.225
Series Xa (Ohms)              24.5           25             24.5
Shunt Xl (Ohms)               61.2           50.0           40.8
The chart tells us several things, including the answer to the second part of our question about the series capacitive reactance. We need to shorten the driven element by an amount that will yield a series capacitive reactance that is near to 25 Ohms. For a 20-meter driven element using aluminum tubing, the overall shortening of the element will be about 10" or so. On 10 meters, half the shortening will yield about the same capacitive reactance at the feedpoint. Shortening the element by this much may lower the resistive component of the feedpoint impedance by an Ohm or perhaps two, but, as you can see from the chart, the required series capacitive reactance will not change by a significant amount.
The value that changes most with changes in the resistive component of the feedpoint impedance is the shunt inductive reactance necessary to effect the match to the 50-Ohm source.
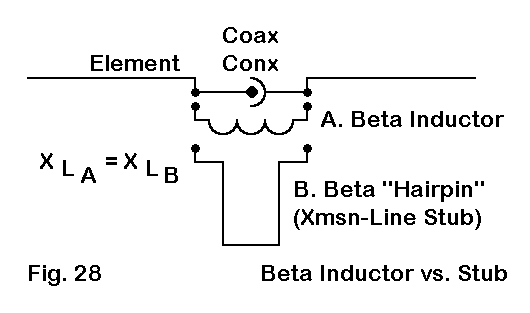
We can provide a shunt inductive reactance in two normal ways. We can convert the inductive reactance for the design frequency into a value of inductance using standard handbook equations. Then we can design a simple coil (a single layer solenoid, as it is called) of #14 to #10 wire having the right inductance. For the small values involved, it is fairly easy to design an inductor with a Q between 200 and 300. Since the network losses are roughly (but not exactly) equal to the value of delta divided by the coil Q, we can see that in ordinary circumstances, losses will be under 1%. Moreover, we can adjust the precise inductance of the small coil by spreading or squeezing the turns until the 50-Ohm SWR at the network terminals is 1:1.
An alternative to the inductor is the shorted transmission line stub. For the most compact assembly and widest bandwidth, a wide-spaced "hairpin" made of wire or rod creates a shorted parallel transmission line section with a high characteristic impedance. The required length is a function of the wire diameter, the spacing, the frequency, and the required reactance. Handbook equations can be used for this calculation, although independent utility software exists to combine all of the calculations into one exercise. One such program was created by WA1SPI and is included in the HAMCALC collection available from VE3ERP.
Although some builders prefer to have an adjustable shorting bar as the rear part of the hairpin, my own preference is for a single hairpin with longer legs. We adjust the hairpin length by clamping down at the antenna feedpoint on the legs at the right points. This system reduces the number of mechanical connections by 2, which in turn reduces the number of potential resistive loss points.
The hairpin tends not to answer directly to standard Q formulations, since it changes the value of reactance in a manner different from the way in which coils change reactance values as we move off the design frequency. However, a hairpin with a characteristic impedance above 600 Ohms tends to have a similar bandwidth characteristic to a beta coil with a Q of 300 or more.
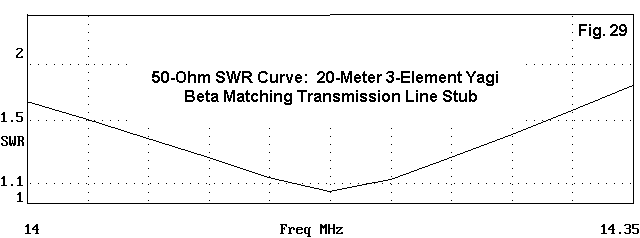
Fig. 29 shows the 50-Ohm SWR values across 20 meters for one of our 3-element models set up with a beta match consisting of a 600-Ohm shorted transmission line a little over 11" long. Modeling software does not show transmission line losses, but parallel lines that are about 1/70 of a wavelength do not have much loss when composed of wires or rods sufficiently thick to handle the currents involved.
One caution is necessary with beta matches. It is possible to find a setting for a coil or a hairpin that effects a match when the series capacitive reactance is not optimal. Often, these settings result in additional and unnecessary losses from the network. Hence, it is important that the builder set the driven element as close as possible to the correct length for the required value of capacitive reactance at the feedpoint.
The Quarter-Wavelength Matching Section
For designs that have a resonant feedpoint impedance close to 25 Ohms, we can use the driven element as given and effect a match to a 50-Ohm line in another way: the 1/4 wavelength matching section.
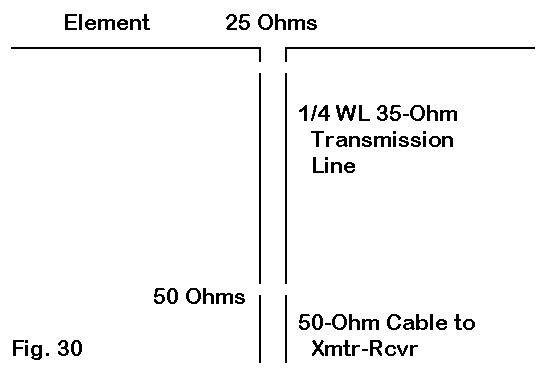
In Fig. 30, we can see the simplicity of the system. Although 35-Ohm transmission line runs about $3 a foot, it provides a set-and-forget matching system (except, of course, at our semi-annual inspection and maintenance sessions).
The use of 35-Ohm cable for the matching section is based on the standard impedance transformation effects of 1/4 wavelength transmission line sections, which answer to the equations

where Zo is the characteristic impedance of the matching system, Zin is one of the two resistive impedance values being matched, and Zout is the other value being matched. The 1/4 wave line length, of course, is the electrical length, and the physical length must be adjusted for the velocity factor of the line--which yields for all coaxial lines a physical length that is shorter than the electrical length. In many cases, the 1/4 wavelength section can be coiled to act as a common mode current choke while still performing its matching duties.
The losses of a 1/4 wavelength matching section will be as low as those of any other matching system. Programs such as N6BV's TLA can be used to check line losses both at the resonant frequency and at the band edges, using projected feedpoint impedance values supplied by an antenna modeling program.
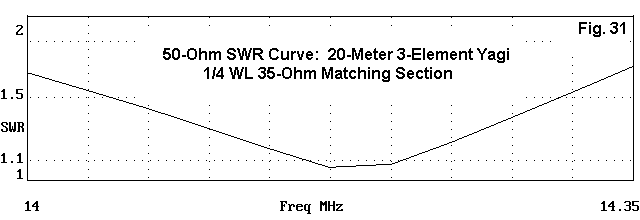
As shown in Fig. 31, a quarter-wavelength matching section is capable of performance very similar to a beta match when it comes to 50-Ohm SWR values across 20 meters. The values in Fig. 31 are insignificantly different from those recorded in Fig. 29.
However, the two methods of impedance transformation are sufficiently different to yield actual impedance values that are also different, despite the fact that the values result in quite similar SWR values. The following table shows the modeled feedpoint impedance values for the same Yagi model with a beta match in one instance and with a quarter-wavelength matching section in the other.
Matching                      Source Impedance (R +/- jX Ohms)
System              14.0                14.175              14.35
Beta                79.6 + j 11.3       50.9 - j  2.7       27.9 - j  0.5
     50-Ohm SWR          1.65                1.06                1.79
1/4 WL Section      35.8 + j 17.8       47.6 + j  1.7       39.5 - j 22.9
     50-Ohm SWR          1.70                1.06                1.75
Conclusions (Of a Sort)
In the end, the selection of a Matching system for a high-performance 3- element Yagi with a feedpoint impedance in the 20-30-Ohm range will depend on a number of factors outside the limits of electrical design. First, the selection of construction design will limit the matching network options. Direct connection of the driven element to the boom will eliminate both the beta and the quarter-wavelength matching systems. The Tee can be used with insulated or uninsulated drivers (relative to the boom). In general, most but not all commercial designs have gravitated toward the used of drivers that are insulated from the boom. In fact, a number of available designs insulate all elements from the boom.
If cost is a factor, the beta match using either a home-made hairpin or coil is likely the cheapest matching system available--but it is no less effective for its low cost. (Although the hairpin is about as cheap as you can get, it is no license to skimp on the quality of hardware used anywhere in the beam. Low quality hardware tends to result in both mechanical and electrical problems with any beam antenna.)
The beta is also fairly easy to adjust, since it is located very close to the hub of the antenna boom-to-mast region. Hence, readjustment at the tower top is easier than with Tees or Gammas. Often, settings chosen in near-ground preliminary assembly phases hold good at the final antenna height.
This entire series has been devoted to some of the electrical design options available to the builder of his or her first 3-element Yagi. A Yagi of this size and performance makes an excellent project for the home builder, since most of the materials can be obtained with reasonable ease. Multi-band Yagis, on the other hand, are best left for later exercises, once one has become thoroughly familiar with all of the parameters of Yagi design--or they are best left to the professional designers who can spend 8 hours or more each day on this difficult task.
If you have never used an antenna as good as a 3-element monoband Yagi, you are in for some real surprises and adventures in operating--once you complete the project. Where your dream designs take you after that will be your own responsibility.
Updated 07-31-99. © L. B. Cebik, W4RNL. This item appeared in AntenneX, July, 1999. Data may be used for personal purposes, but may not be reproduced for publication in print or any other medium without permission of the author.