
 Beyond the License:
As an adjunct to preparing students for the license exams, we can teach station design more systematically than we currently do. Better teaching is often a matter of collecting and organizing material under a coherent set of principles. Ergonomics, the study of the human dimensions of the workplace, is not as organized as electronics. Hence, the principles are not absolute. However, we can organize the subject so that the student has a mental checklist of things to consider.
The following notes are a step in the direction of organizing station design ideas in a way the student can use, master, and adapt to his or her particular circumstances. Their importance lies in the contribution they can make to the new ham's operating satisfaction and success. In some ways, then, they can be as important as a ham's selection of equipment and antenna and his or her knowledge of electronics and the regulations.
We can group the basic principles of ham ergonomics into four major groups:
Each category collects a number of subsidiary principles. Moreover, each idea requires adaptation to different types of operation and personal circumstance. For example, the operating position of an exclusive VHF packet operator will look quite different from that of a CW dxer. In these notes, we can cover only the high points of each category and hope they are clear enough to be applied to the new ham's real world and to the ham teacher's encounter with his or her student's questions.
1. Electrical Safety. Electrical safety has three major components: AC and DC power, RF currents, and RF radiation.
a. AC and DC Power Lines: Since most equipment is well housed today, AC and DC power lines and junctions are generally well protected from casual and fatal contact. However, component failure does occur, and dangerous situations can arise at the operating position. Shorted bypass capacitors can make the equipment cases hot, and protective circuits may operate only if the house ground is effective.
Every station, therefore, should have an effective ground, a short wide conductor connected to a deep ground rod or copper water pipe. The house ground should be periodically checked for effectiveness by measuring the voltage between the station ground and the third wire and the neutral wire of the station's AC outlet.
All power cords--AC and also DC lines from independent power supplies to transceivers or amplifiers--should be completely insulated with no exposed contacts. Cords should be out of reach and not kinked in ways that promote insulation wear and eventual wire exposure.
The wall sockets that supply AC power to the equipment should never be overloaded. Ideally, the station should have a separate 110-volt line with its own circuit breaker. In practice, this is usually not feasible. However, be certain that the circuit used by amateur equipment is not shared by heavy current users among the household appliances. If you add or plan to add a high-power amplifier requiring 220 volts, be sure it has its own circuit and breaker.
There should be a master AC switch for the station, one that cuts power to all equipment. This may require building a master AC panel for the shack and instructing family members in its use. The panel must meet wiring codes, but the components are usually inexpensive. Such a panel with a master plug as well as switch once saved my life.
b. RF Currents: RF currents can be exposed at terminals, cable junctions, open equipment, and antennas. The principles of solution are straightforward. Just as antennas should be high and out of reach of any person, so too, terminals should be inaccessible. Cable junctions should be inaccessible or shielded, or both. Open equipment should be closed.
The dangers here are similar to those of contact with power lines: electrical shock and burns. In this respect, we can think of the antenna balun as a safety device in addition to its other functions. Antenna currents flowing on the outside of coax cables that make the equipment cases "hot" are not merely annoyances; they are dangers, especially to the uninitiated.
c. RF Radiation: Related to, but not identical to, RF current dangers are potential dangers from exposure to RF radiation. The exact dangers are still under study, but safety dictates that all radiating structures (antennas) be as far away from human bodies as possible. The more power they radiate, the farther away from humans they should be. The higher the frequency, the more probable the danger for a given power and a given distance from the body.
Expressed in these blank terms, the basic ideas can cause unnecessary fear of amateur operation. The proper way to present these ideas is as a search for better solutions to antenna placement challenges and for good decisions as to equipment power. Sensitizing new hams to radiation safety includes stirring their interest in reading the latest developments and findings in QST and other reputable journals.
2. Mechanical Safety. As important to safe operation are the mechanical factors in a station. We can divide our thinking into two departments: physical dangers and security.
a. Physical Dangers: A complete catalog of potential physical safety problems would require a book. The basic principle is simultaneously to protect people and equipment from damage by accidental contact with each other.
One of the most common dangers is cable maze: the looping and twisting of cables under and near the equipment. Not only do people trip over cables, cables often attack the operator's feet, wrapping themselves around like vines. The equipment has crashed to the floor or the cables have broken before they turn loose. The solution to this problem is a cable trough at the rear of the operating table or under its rear lip. Hardware stores are full of hook-like devices that will hold cables in a free but neat bundle out of the way of unwary feet.
Often overlooked by experienced as well as new hams is the physical danger that sharp corners and precariously balanced heavy equipment may present. It pays to recess all equipment so that bumps cannot knock the gear loose, damaging either the person who bumps it or the gear itself. Likewise, recessing equipment into consoles or shelves protects unwary body parts from cuts and gashes as they pass over sheet metal corners or sharp projections.
b. Security: If you are lucky enough to be able to devote an entire room to the ham station, consider adding a lock to the door. If there are small children in the family, a sliding bolt well above their reach may be enough to keep small hands from getting into danger when no one is looking. Security also dictates a fire extinguisher in the station. It should be mounted in a handy location and be rated for electrical fires.
More commonly, the modern ham station is located in a room that is shared with other family functions. As equipment shrinks, a very versatile set-up may require little more room than a personal computer. In this case, security moves from the door to the operating position. Consider putting the equipment in a unit with doors that you can lock when the station is not in use. You may even wish to build special ducts for the cables. The primary object is to secure the station from any entry that might remotely harm the innocent invader. The secondary--but also very important--goal is to protect the equipment from uneducated and unauthorized handling.
Of course, the most safe and secure station is the one surrounded by educated adults and children. Not every family member may become a ham, but everyone in the family can learn to respect the station equipment, to know what to do in the event of an emergency, and to share both the successes and frustrations of amateur operations.
1. Furniture. Since equipment is not self-supporting (the days of 6' rack panels are mostly gone), it requires a desk or console for support. Furniture fulfills at least two functions: support and storage. Desks have one support surface and usually many storage drawers. Computer consoles with upper shelving provide more support surfaces, but usually fewer storage drawers and shelves. Some consoles have doors that can safely secure the equipment and keep the electronics out of sight in a multi-purpose room.
For larger layouts, unfinished doors supported by pedestals with shelves, cabinets, or drawer units provide up to 7' of operating room. I personally prefer wider doors (up to 36") to leave plenty of writing, keyboard, and elbow room in front with space for a cable trough behind. However, 30" doors work well for many installations.
Of course, hams with extensive woodworking skills can develop custom furniture to support and protect their equipment functionally and beautifully. The U-shaped console is perhaps the most accessible arrangement for an extensive array of equipment. Plywood or laminated panels with cutouts and support shelves can shield equipment and cables from curious fingers while allowing good panel access in front and good air flow behind. A wheeled swivel chair is a must. More linear L-shaped arrangements are also serviceable.
Effective operating requires not only that the furniture support the equipment, but that it supports it correctly relative to the operator. Correct support has two dimensions: the vertical and the horizontal (or elevation and azimuth, if you prefer).
2. Equipment and Accessories. Equipping the station is a function of the primary operating interests of the new licensee. Although these notes are devoted to everything except the primary equipment, the best possible advice for the new ham is to leave room at the operating position for growth. New interests, hamfest bargains, and a host of other incentives will cause a station to grow.
The other basic principle concerns our usual neglect of the space taken by station accessories. Telephones, microphones, keys and keyboards, logs, note paper, and many other operating needs often end up competing with elbow room at the operating position. Planning for these items in advance can make the difference between a discouraging mess and a clean, effective set-up that even has a safe corner for a coffee cup.
In addition, every station needs close at hand a number of operating aids. Most of them are paper. Spare scratch pads, repeater directories, antenna bearing charts, ham magazines to read during quiet band times: these are typical of the paper aids that need both storage and access at the operating position. Spare fuses, an extra microphone, patch cable, and headsets are among the bulkier items that often need storage at the operating position. Desk drawers or shelves are a necessity.
3. The Vertical Perspective. Seated at the operating position, we scan our equipment vertically. Fig 1 shows a general outline of the situation. There are three major areas of concern.
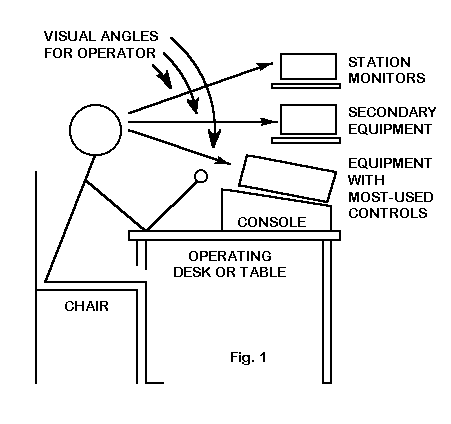
First, the heaviest equipment with the most used controls should be in the prime sight line and hand line. Auxiliary equipment with less used controls should be in the next tier, with visual monitors above. This arrangement is most relaxing for both the eyes and the arms. Note the room for a cable trough behind the equipment.
Second, visual angles should be as natural as possible. Note that the main piece of gear presents a flat face to the operator in his or her natural seated position. This facilitates reading out frequency, meter, and control settings. The equipment on the elevated shelves should not be higher than a lifted head can easily see.
Third, the controls of the main gear are elevated for ease of adjustment with elbows on the table top. Achieving this goal often requires a sloped console base, since equipment bales are usually not long enough to do the job. The space under the base console is useful for storing papers, CW keys, and other items, for housing a master AC safety panel, and for meters and accessories.
3. The Horizontal Perspective. Horizontally, equipment should ideally be laid out according to principles of focus, quadrant, and halo. Fig. 2 illustrates the three concepts with a typical modest HF station. VHF, SSTV, RTTY, packet and other specialized operations will have their own layouts, but three focus-quadrant-halo principles will still apply. Of course, most of us can only approximate the ideal.
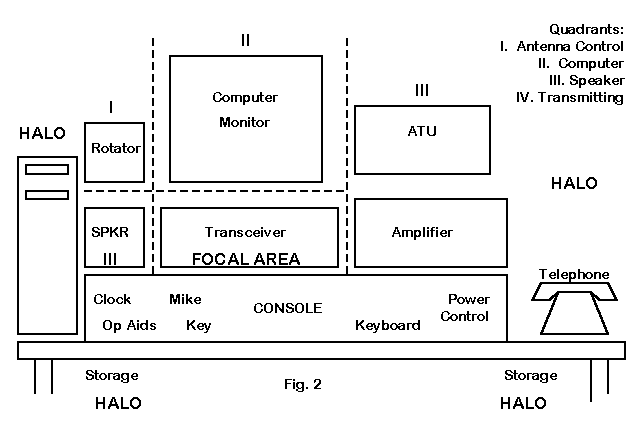
a. The Focal Area: Central to the position is the main equipment of the operation, the gear that requires the closest attention to readouts and controls. Its centerline position and vertical placement where both eyes and hands can reach it are crucial to effective operation. In the HF illustration, the focal gear is the transceiver. In a VHF packet station, it might be the rig and the computer keyboard right in front of it.
b. The Quadrants: Surrounding the focal area should be quadrants of related pieces of equipment. Around the center of Fig. 2 are 4 quadrants for transmitting, computer, antenna control, and speaker functions. Note that each functional quadrant groups together related equipment.
Every quadrant assignment will be a compromise between operating needs and ideal equipment spacing. The weight of the amplifier with its power transformer demands support, while the lighter transmatch can be placed higher. If we assume that the computer is central to station operation, it needs a central position for monitor viewing, even though that may separate the transmatch from antenna control functions. If the computer is a peripheral device for occasional use, then it might go on the right, with the antenna functions moved to the center. In this example, the vertical computer case goes to the far left, with the monitor positioned centrally for easy reading. All of this, of course, presumes that the cables exit the station to the right of the position.
The objectives of the quadrant principle are many. Related gear belongs together for minimal cable runs. The most handled equipment requires easiest, most direct access. Crucial monitors and readouts require the most direct eye contact. Power and RF cable directions can modify quadrant placement. Even being left- or right-handed can make a difference in deciding the best placement for each quadrant.
c. The Halo: Around the quadrants, and beneath them, is a halo for all the miscellaneous items that go into operating a particular station. These include the telephone, the log, the mike, the key, the keyboard, operating aids, and often- used pieces of test equipment. Whatever the support system you use for your equipment, leave a little extra surface, shelf, and drawer space to keep needed extras close at hand. At my own station, a world globe sits atop the gear, and file drawers hold all sorts of paper work, including some magazines to read while waiting for a band to open. Finally, find a safe place in the halo area for your coffee cup or soft drink glass, well away from the rig and the keyboard.
Combining furniture ideas along with vertical and horizontal perspectives of equipment placement is best done on paper first. Paper is light and cheap compared to the other items and permits a dozen changes without a single strained muscle. A little planning goes a long way toward comfortable and effective operation.
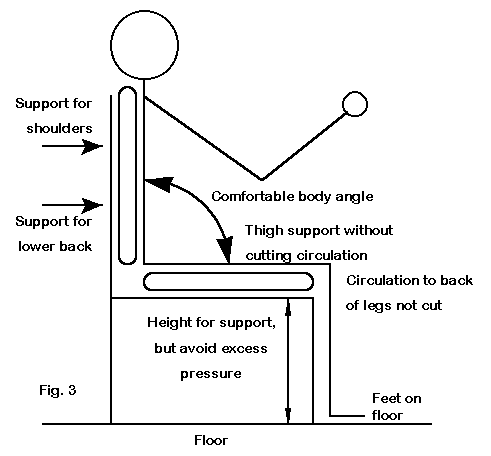
1. Seating. A good chair is a must for any operating position. A good chair must support the base of the shoulders and the lower back. The length of the seat pad should support the legs, but not cut off circulation to the calves. The seat should be just high enough to support the thighs while leaving the feet on the floor, again, so as not to cut off blood in the back of the thighs. Fig. 3 illustrates these points.
Well-designed office chairs with seat and back adjustments often work well as ham operating chairs. The wheels are handy for turning as well as moving, but the base should be broad enough to prevent the chair from tipping over. If the chair has arms, they should not interfere with the operator's arms.
These design features, of course, are idealizations. Some operators are only happy if they can hunker down in an old overstuffed chair, while others require a hard-bottom straight chair to help them stay alert. Whatever the choice, be sure to check yourself periodically to see if your chair is unnecessarily fatiguing you or interfering with what you want to do.
If the shack area is large enough, leave room for an additional chair for observers and visiting operators. In part, that is a matter of ham hospitality. Additionally, the chair may be a good place for a potential ham in the family--spouse, sibling, child--to get close to the operation and feel a part of it. With attention to just a few details, every ham station can be a recruitment center for new hams.
2. Light. Room lighting often leaves the operating position in the dark, or--what may be worse, in sharp dark shadows. If the operating position is near a wall, a central ceiling fixture often will not suffice to prevent eye strain. Yet, an equipment-filled operating desk or table often cannot find room for a lamp.
Supplemental lighting may consist of either lamps at the operating position or a new ceiling fixture overhead. Either system will work if you attend to some basic principles. Lighting should be adequate, but diffused to prevent harsh shadows and blinding reflections on readout panels. Lamp shades should protect you from having to look directly at the light source. Since diffusers on light fixtures and lamps cut down on the light going in any given direction, start with a larger bulb, perhaps as much as 200 watts.
The perfect lamp or fixture may not exist. Most lamps with diffusers stand straight up, but you may need a swing arm to place the light over the space between you and the equipment. In such cases, you may have to be inventive, combining elements from more than one source to create the perfect lamp or lamps.
Use care both with fluorescent fixtures and with high-intensity lamps. Be sure you can withstand the type of light they produce for long periods before making either kind of fixture a permanent part of the shack. Remember: the goal is both good illumination and long-term eye comfort.
3. Ventilation. Good air flow and temperature control are essential to operating comfort and good health. You should not sit in either a hot or a cold draft. Hence, do not place the operating desk or table over a heating or air conditioning vent. If the walls have air registers, be sure the air flow does not pass directly over you on its way either in or out.
On the other hand, be sure that air can move around the operating position. Ventilation is necessary to carry heat from the equipment, and it must have somewhere to go. Likewise, operating comfort and efficiency are best if the temperature and humidity are reasonably constant without the air going stale. Hot or cold cul-de-sacs within a house or its basement are not the best places for an amateur station.
Other amenities of personal comfort are largely a matter of taste. Places for a sink, coffee pot, cold drink storage, snacks, pillows, etc. have no general planning principles. Indeed, only two principles apply to these refinements: 1. if something is important to you, have it at hand or accessible; 2. if it can cause harm to the equipment by way of spillage, sharp points, and the like, do not make it too accessible.
1. Site Inventory. The first step in evaluating a room as a prospective shack is to diagram everything relevant to our operation. Fig. 4 illustrates a hypothetical room.
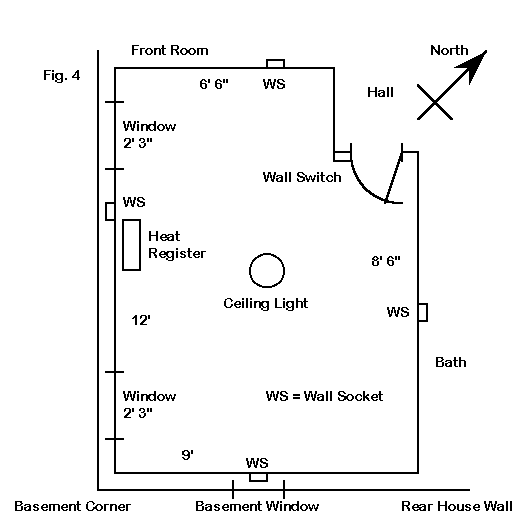
The sketch in Fig. 4 provides information on everything in the room: heat registers, AC sockets and switches, existing lighting, window placement, and even door swing. It includes all the important dimensions. Additionally, the drawing says something about what adjoins the room, in this case a front room along one wall and a bathroom along the other. (The adjacent bathroom might well be an advantage to a contest operator.)
The drawing does not limit itself to one floor of the house. In this case, the sketch shows relevant parts of the basement. These (or attic) details may be important when considering where to place the operating desk or table.
For example, suppose your operating desk is 5'10" long by 2'8" wide. Antennas will be in the back yard. The outer wall with windows is not a good site, since the desk would cover the heat register. The 6' by 3' alcove is tempting, because it would snugly place the equipment in its own space. However, sounds from the equipment would reach the front room, and the cable runs would be a problem. Hence, the best position might be along the rear windowless outer wall with a basement window just below.
The sketch does not tell us everything we need to know about the room. Be sure the walls have a pleasant appearance, since you will be seeing a lot of them while operating. Test the walls and ceiling for acoustics, and add sound dampening materials if appropriate. Measure window sill heights before placing furniture. Determine the clearance needed for passage though the room to and from the door. Check the walls for their ability to support any shelving or other construction you intend. Check the floor: Can you drill through unobtrusively for your cables? Do you need mats to dampen foot noise? It is easier to modify and perfect the station room before installing furniture and equipment than afterwards.
2. Cables. To the room in Fig. 4, you may wish to add a 220 v. AC line to power the amplifier. Power cables must meet all applicable codes. Indeed, it will be wise to test the existing 110 v. AC socket. It should be a #12 2- wire plus ground circuit with a 20-Amp fuse or circuit breaker. Additionally, it should be as isolated as possible, with a minimum of other household equipment using the same breaker or fuse.
Antenna cables may be the greatest challenge in the shack. One goal is to use the shortest feasible run of cable to the antennas. Assume for the sake of example that the antennas are in the back yard. Placing the operating table along the rear wall of Fig. 4 permits the cables to leave the shack through the floor and out the rear basement wall either through the basement window frame or through the perimeter joists. Alternatively, they may leave through the rear wall using PVC or other tubes packed with thermal insulation around the coax.
The second goal is to make as few modifications as possible to the house. Save plugs from the hole cuts for reinstallation if you sell the house. In any event, be sure the cables have easy passage with no binding. Use enough cable to allow looping turns rather than sharp bends. Support the cable every few feet to prevent deformation from sagging.
3. The Rest of the Room. Our 9' by 12' room would make an ideal shack if we could put all our radio activity and nothing else in the room. A quiet test bench with tools and an array of meters might go into the 3' by 6' alcove next to the door. Book and magazine shelves could go along the wall between the door and the operating position. Some comfortable chairs and reading lamps could go next to the windows. Or, a separate desk and computer station might go on either side wall for correspondence, QSLing, and other ham paperwork. The possibilities are nearly endless.
As noted earlier in the discussion of the principles of security, only some of us are lucky enough to be able to devote an entire room to ham activities. In many instances, amateur radio will have to share space with other family enterprises. In that event, strive to keep the shack separated by a real or imaginary barrier. The barrier should keep objects and instruments --things like toys, tools, and small appliances--from entering the operating area. The barrier should also be a sound cushion to keep the bustling clatter of family life outside and the odd chatter of ham radio inside. If everyone in the family is educated to respect the barrier, it may work better than any wall. However, amateur radio is just one facet of family life. Sometimes it must give way to more pressing needs.
4. Maintenance. Although shack maintenance deserves extensive discussion all by itself, perhaps a very few words here can alert the new ham to the need for continuing preservation of his or her ham investment. Maintenance has three major dimensions: clean-up, performance checks, and service. Cleaning up the operating position on a daily basis is somewhat of a drudge, but essential to the long life and neat appearance of the equipment and furniture. Gummy dust is an enemy to equipment, but easily avoided by routine wiping.
Equipment ages and often loses performance so slowly that we do not notice. Periodically checking performance and keeping a record of those checks can often spot a problem before it becomes catastrophic. Received signal strength of local stations and power output measurements are the beginning of a good performance checklist. Although modern solid state digitalized equipment often requires less periodic servicing and alignment than older tube-type completely analog gear, plan some service money into the ham budget. These smaller amounts can save the cost of premature equipment replacement later on.
The shack is a composite of technical requirements and personal factors. The latter includes ourselves in terms of what we want out of a shack, our physical environment, our human environment, and--of course--our finances. For the lifelong ham, there never comes a time when something better cannot be done with or to the station.
Shacks change with time, just as do operating interests and family circumstances. A dozen years down the road, the sophisticated customized station layout will surely be better than the first assemblage of equipment. But the first shack will linger in memory as the most exciting. It will be that place for the first contacts, the first successes, and the first frustrations. Therefore, the more instructors can do to pass along fundamental principles for good shack design, the more likely will be the prospect for that complex and refined station of the future.
At the same time, putting together a ham shack draws upon skills and
talents that go far beyond the technical electronics, the rules and
regulations, and the good operating procedures we teach in licensing classes.
And every classroom full of potential hams and upgrading licensees brings
together an abundance of ability and knowledge, some of which may contribute
to improving our own shacks. In the end, then, teaching the precepts of
shack design involves as much listening as it does talking. Some of the best
features in my own shack have come from the students I supposedly taught.
From Proceedings of the 1994 National ARRL Education Workshop, (Newington: ARRL, 1994), pp. 15-22 © L. B. Cebik, W4RNL. Data may be used for personal purposes, but may not be reproduced for publication in print or any other medium without permission of the author.