
 Introducing the "All-Band" Doublet:
Perhaps too many new hams embarking on their first HF adventures think only of resonant dipoles fed with coaxial cable and plugged directly into the transceiverţs output connector. Many end up with a mass of wires in the back yard as they try to make separate antennas for 80, 40, 15, and 10 meters. Others think that they are restricted to only one band because they have room for only one antenna. Too few modern Elmers have the personal experience to guide new HFers into one of the oldest ham antennas of all: the all-band doublet.
It may be useful to review what it takes to get the doublet on the air effectively. The data comes in two parts: 1. information that every doublet user should have initially, whether a student or an experienced ham, and 2. opportunities for the instructor to assist students and new hams in gaining some practical knowledge about problem solving, parts acquisition, and a number of other areas that stop some newcomer projects in their tracks. An all-band doublet is a rather refined antenna system when looked at in detail, but it is also relatively easy to get on the air with it. If the student runs into difficulties or has questions, the instructor can help him or her work out the answers. There are many opportunities for advanced Elmering with the all-band doublet
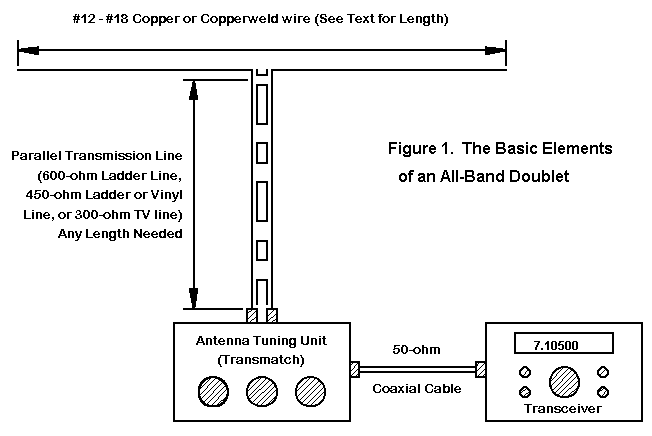
1. The Antenna: The antenna proper consists of a length of copper or copperweld wire, with a center feedpoint. Three popular lengths for the antenna are these:
a. 130-140' (best, if you have the room and want the strongest results on 80 meters.
b. 90-110' (works second best on 80 meters, with good results on all other bands).
c. 65-75' (good for 40 meters through 10 meters, but not for 80).
Notice that the precise length is not critical. Much more critical is getting the doublet as high as you possibly can. Although the antenna will work at low heights in the 20-25' range, it does much better (especially on 80 and 40) when it is higher than 35' up. You can use available trees for support, or you can even build your own support poles or trusses from designs in the ARRL Antenna Book.
Many inexperienced hams will need guidance in the selection of materials. Obviously, #14 stranded wire, readily available at stores like Radio Shack, will fill the bill. However, if there is a local hamfest, you may want to guide the new ham in the purchase of copperweld wire. You may also have to guide him or her in its peculiarities, especially how to keep it straight while trying to assemble the antenna. Insulated copper wire will also work well if it is sufficiently strong. The inner ends will require insulation stripping to make connections, but the far ends may be left insulated. The twisting of wires at these ends to make a loop for the support line will introduce no significant changes to the antennaţs operation.
A second area where guidance can be critical is in the selection and use of antenna supports. Home-made trusses and their guying are not simple matters. Neither is trying to get a line over a branch 40' or more up a tree. The many techniques for launching a line often depend on local talent, whether that talent is tree climbing, bow-and- arrow, fishing rod, or slingshot. Guide the new ham to the local talent and be sure that safety lessons accompany the talent.
Of course, the ends of the wire need to be insulated from the support, so you will need end insulators and rope for the job. A good 1/4" sun (UV)-resistant synthetic fiber rope will hold up most antennas unless they are stressed too tightly.
Suppose that the antenna will not quite fit the space available. One standard technique of reducing the real estate needed is to set up the doublet in the inverted-Vee configuration. This version of the doublet tends to circularize the pattern, but reduce overall gain of the antenna at almost every frequency of use.
Consider bending the elements instead (if supports are available). Drooping ends are the most common version of this arrangement. However, setting up the antenna as a "Z," with all parts of the antenna wire as high as possible, often provides better performance. Drooping ends, and even ends bent in the same direction, provides some radiation cancellation, especially on the lowest bands of use, while the zig-zag version--if not too radically Z-ed--tends only to bend the pattern's directions.
Once more, a newcomer may need some guidance--or even just a second pair of eyes--to see clearly all the possibilities and potential problems of laying out an antenna within the confines of his or her yard. What makes a good support, what directions the wires should go for maximum communications, and what hazards to avoid are all questions calling for experienced advice. However, try not to take over the entire job from the newcomer.
2. The Feedline: The second element is the feedline. For this antenna, we use a parallel transmission line because it has very low losses, no matter what the SWR (within reasonable limits). 300-Ohm TV ribbon line will work, but it is not the strongest. Most ham dealers can get 400-Ohm or 450-Ohm vinyl-coated transmission line with larger wires. Completely open ladder line, with only insulated spaces, also works well but is less common.
Guidance in the selection of feedline may also be needed, especially in knowing which cheap and weak lines to avoid. If there is a local hamfest that is likely to draw a reputable antenna wire and feedline dealer, helping the new ham make his or her purchases is an act likely to be appreciated for years to come.
Unlike coaxial cable, which you may run close to any object, parallel transmission line should be as free and clear of objects as possible. If the line must be brought down parallel to an object, such as the wall of a house, use insulated spacers to keep the line several inches away from the object. Avoid bringing the line near metal gutters and down spouts, power lines, conduits, or other metallic objects. Close proximity to metal can disrupt the balance between the wires of the feedline, adversely affecting its performance. Wherever the line must change directions, keep the angles shallow and, if at all possible, keep the line at right angles to the antenna wire.
Use special care when attaching the feedline to each side of the antenna wire center feedpoint insulator. Be sure that connections are mechanically secure, and then solder the feedline wires to the antenna wires. Test the connections for movable wire bends that may cause a break while swaying in the wind. Recently, some ladder-line ţgrabberţ center fixtures have appeared on the market to secure the ladder line to the antenna wire and reduce the danger of breakage: they are well worth the investment.
One special problem deserves special attention: getting parallel feedline into the shack and over to the antenna tuner. There are almost as many ways to solve this problem as there are all-band doublet installations. The type of solution used depends largely on where the feedline enters the house.
If the feedline enters at a window, one can bring it through the window frame or through a board installed at the base of the window. Both have advantages and disadvantages. Bringing the line though the wooden window frame defaces the frame. Using a board on which the bottom section of the window closes requires special means to ensure insulation and security around the window. In each case, one can use a pair of bolts spaced about the same distance apart as the wires and make separate indoor and outdoor attachments. This feature is important, since it permits detachment of the feedline when electrical storms are imminent or when going on vacation.
Feeding a parallel transmission line through a wall calls for even greater care. One simple system (among many) uses a short length of PVC run through the wall and weather sealed around the edges. Some hams center the transmission line in the tube and hold it in place with fiberglass insulation. Others use plastic spacers with a center cutout to hold the line in place and seal the tube. There are many variations on this theme, but the old idea of simply slamming a window frame down on the transmission line at the window should be discouraged, especially with metal window frames. In all cases, there should be a way of disconnecting the transmission line out of doors and grounding it.
Routing the feedline within the house or shack calls for equal care. Ideally, the tuner should be as close to the line exit point as possible. Feedline should not be simply drooped on the floor or haphazardly tacked to the walls and ceiling. Spacing from invisible metal in the wall cavities is as essential indoors as is spacing from outdoor metallic objects.
Helping new hams analyze where duct work, house wiring, telephone wires, and metal plumbing pipes may be located in house walls is another arena of assistance too often overlooked. Many new hams are as initially uneducated about house structures and utilities as they are about amateur electronics. Showing the student how to look at house fixtures, outlets, switches, telephone and cable connections, and plumbing routes and to use these signs to make good estimates of their routings through the house may be a really enlightening experience for the student.
3. The Antenna Tuning Unit or Transmatch: The "antenna tuner" is a network for transforming the impedance that is present at the shack end of the transmission line to another value, normally 50 ohms. An all- band doublet shows a different feedpoint impedance at each frequency of operation. The exact length of the antenna relative to the frequency will largely determine that impedance. The feedline will transform that impedance continuously along its length, repeating values every half wavelength of line. Since most transmission lines have a velocity factor, a half wavelength of line will be shorter than a true half- wavelength for the frequency of interest.
All of this together means that the exact impedance presented to the antenna tuner will vary from band to band and from one antenna installation to another.
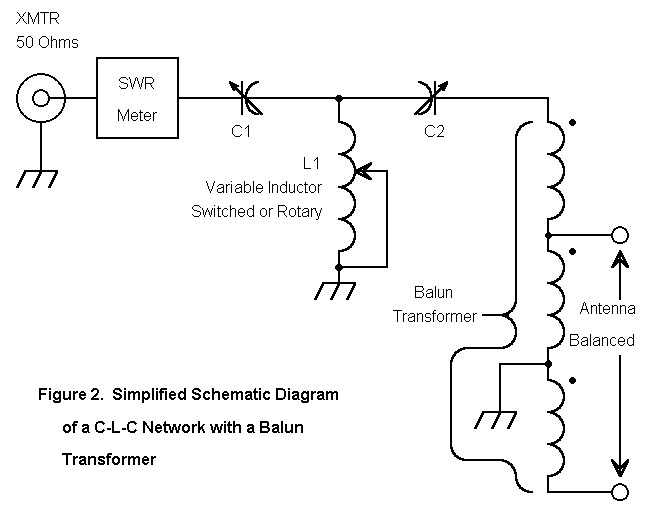
Most antenna tuners use unbalanced networks. The most popular network used in commercial tuners is the series C, parallel L Tee network, schematically shown in Figure 2. The popularity of this network stems largely from the fact that it is the most economical to produce and from the relative ease of tuning it to an adequate low-SWR match.
Unbalanced networks employ a 4:1 transformer or balun to allow for the use of balanced feedlines. This feature often means that the antenna tuner settings that produce a low SWR between the tuner and the transceiver may not give the highest efficiency of power transfer. However, for most general purpose communications, efficiency will be adequate.
Building one's own antenna tuner or transmatch is a good introduction into the satisfactions of home construction. Students may need guidance in the selection of parts, many of which are available these days only from surplus outlets or at hamfests. Helping the student select parts that are suitable in their range of values and their power-handling ratings without paying too much is an invaluable service. Another avenue of help is asking local club members to search their junk boxes for components they may be willing to sell or donate to the cause of aiding a new ham.
A second avenue of guidance is helping the new ham select a suitable commercial tuner, if that is his or her favored route. Interpreting specifications, evaluating features, and teaching the student to look at the tuner as a long-term investment that can be useful many years down the road are all important activities that teach by example the practiced art of reading ads and brochures and making the best possible choice of equipment for oneţs present and future needs.
Since antenna tuners do not wear out unless severely abused, used transmatches should be as good as new ones, and perhaps less expensive. Once more, helping a new ham scour a hamfest for the best used equipment available--showing him or her what to look for and what to look out for--may be a real service that has long-term benefits. New hams also need a little help in learning how to bargain down a price.
If the all-band doublet is to be a long-term antenna for the new ham, and if home-brewing is an interest, then the best antenna tuner may not be the C-L-C network with a balun to handle balanced lines. Instead, there are circuits in the ARRL Antenna Book and elsewhere for link-coupled antenna tuners that have balanced outputs ready for the parallel feedline. Finding the right coil stock and capacitors, however, may be a fair-sized challenge these days.

Since the most common tuner is the C-L-C Tee with a balun for balanced transmission lines, let's see what the set-up for it consists of. First, use a low power setting for initial tune-up. Second, for each band, find an empty place to do your tuning in order to minimize QRM. Third, read the tuner manual to see if there are any recommended initial settings for the controls.
The next step is to apply low power and find the settings of the controls that allow you to achieve a 1:1 SWR. Record the setting. Now increase power to the level at which you intend to operate. You may have to tweak the settings just a bit.
Repeat the process for each of the bands. If you have never used this kind of set-up before, you might practice moving from band to band so that you do not forget to check the settings and make final adjustments before going to full power.
For each band, also check how far up and down the band you can move the transmitter frequency without exceeding a 2:1 SWR. Make notes on whether the settings are broad or sharp for each band. Sharp tuning often indicates either of a high SWR or a high level of reactance at the tuner antenna terminals--or both.
On some bands, you may find more than one set of control settings that will give a 1:1 SWR. For C-L-C tuners, the rule of thumb is to use the setting with the higher output capacitance, which usually coincides with a lower value of inductance. These settings are normally higher in efficiency. However, you should listen to signals on the band with each set of control positions and use the ones that yield the stronger signals--if any difference can be detected.
At the other extreme, you may discover that on some bands, there are no settings that will produce a 1:1 SWR. This condition normally means that the impedance at the antenna terminals of the tuner has too much reactance, either capacitive or inductive, and the tuner cannot both compensate for it and also end up with a correct value to make the match perfect.
The easiest method of overcoming this problem is to change the feedline length by patching in a 6' to 10' section of line between the tuner terminals and the "regular" line. Since a transmission line is an impedance transformer along which the values of resistance and reactance are constantly changing (if the SWR is initially greater than 1:1), changing the length of the line changes the values of resistance and reactance presented to the tuner.
Sometimes, the new line length will work with all bands. In other cases, keeping the "patch-in" section handy is necessary for a few bands.
For new hams, these procedures are often mysterious, and a "doom-and-gloom" factor can set in as soon as they discover that everything is not perfect on the first try. Reassuring them and showing them a few tricks of the trade can go a long toward increasing their confidence that they can tackle new challenges and overcome them. As always, however, let the newcomer handle the controls as much as possible.
Part of the answer lies in the nature of the ham bands, but part of the answer also lies in the antenna itself. An all-band doublet produces a different radiation and reception pattern for each of the ham bands. In addition, the angle at which the radiation goes out and comes in most effectively varies from band to band, with the higher bands generally having lower angle radiation than the lower bands. (This accounts in part for better DX results on the upper bands.)
Although providing a complete set of patterns for all versions of the doublet would require lots of space, I can at least provide a small rogueţs gallery of some patterns.
Let's assume that we have a 135' doublet (plus or minus 10') at about 50' in the air. What sort of patterns would this antenna make for each of the Novice CW bands? Making allowances for the highly variable effects of terrain in the general region and the ground clutter that surrounds most homes, we can expect something like the following patterns for each band. Remember that the upper azimuth pattern in each set assumes the doublet is aligned from left to right. It is taken at the elevation of maximum radiation (except for 80 meters). The lower elevation patterns are taken along the strongest lobe of the antennaţs pattern on that band, whichever way that lobe might be pointed. Azimuth patterns generally tell us in which direction over how broad a span our signals go, while elevation patterns tell us at what angle most of our signal hits the ionosphere, to be reflected back toward earth and a receiving station.

The 80-meter azimuth pattern is taken at an elevation angle of 45 degrees. As the elevation pattern shows, most of the radiation is above this angle. Some hams call the relatively low dipole a cloud- burner. Although this is not a DX antenna, there is plenty of useful radiation for all kinds of excellent 80-meter QSOs.
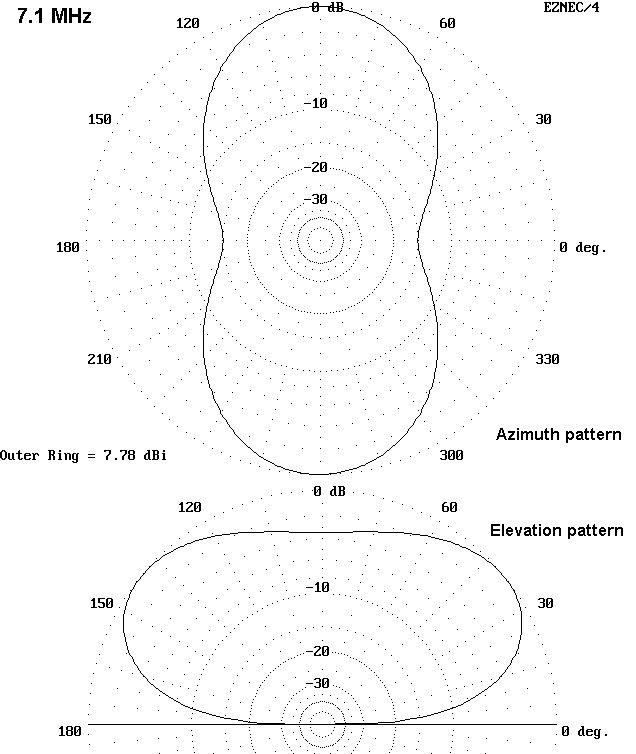
On 40 meters, the all-band doublet has a narrower pair of lobes, but the radiated signals in the primary directions will be stronger (and reception more sensitive). The elevation angle of maximum radiation is 39 degrees. However, note that there is a lot of energy being sent out (and received) at lower angles. Hence, the possibilities for DX improve. However, the antenna proves most useful for cross-country QSOs ranging from 800 to 2400 miles, depending on the time of day. These will mostly be broadside to the antenna wire.
If we had installed the antenna as an inverted-Vee, with the wires sloping downward from a central support, there would be a few modifications to the pattern. Instead of a peanut, the azimuth pattern would be more oval, giving more reception and less rejection off the ends of the antenna. The angle of maximum radiation would also be just a bit lower, although maximum signal strength at the peaks of the major lobes would be down just a bit. For general operating, the differences are not likely to be noticed without a side-by-side test.

On 15 meters, the antenna is 3 wavelengths long. Note that there are 3 major lobes on each side of the wire. The stronger outer lobes are about 45 degrees off broadside. The elevation angle of maximum radiation is about 13 degrees, well down into DX territory. Since 15 is a good DX band, it would be nice to align the antenna so that one of the major lobes points at a desired DX territory.
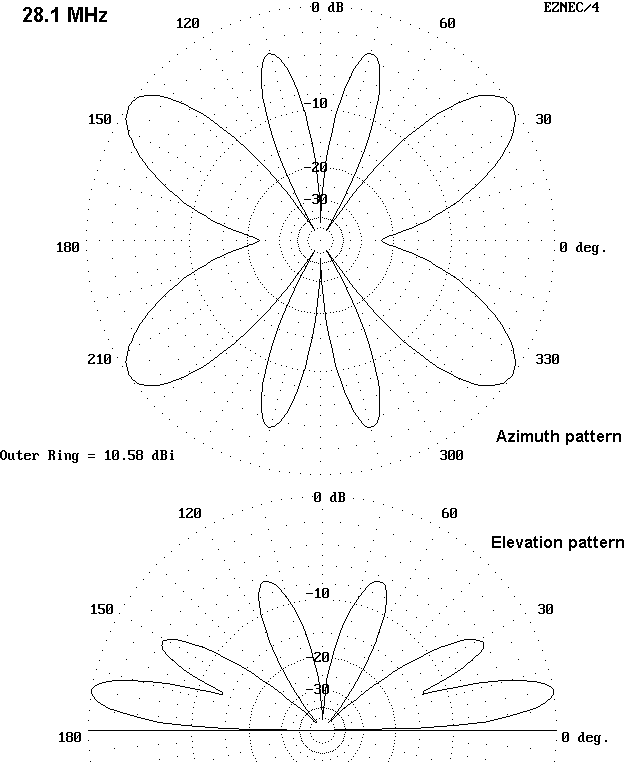
On 10 meters, the doublet is 4 wavelengths long, and there are 4 major lobes on each side of the wire in the azimuth pattern. The elevation angle of maximum radiation has dropped to 10 degrees, and the antenna is capable of allowing us to work a lot of DX--if one of the main lobes is pointed in the right direction. The main lobes are about 35 degrees from the ends of the antenna wire.
Newcomers are becoming more and more sophisticated about antenna patterns, since a few appear in almost every issue of the amateur radio magazines. However, what the patterns really mean may not be clear. Instructing newcomers in how to use azimuth and elevation patterns will help them make better use of the large amounts of antenna information available these days.
One especially important lesson to teach is that all of these patterns have limitations, since they are generated by computer rather than by actual measurements made of the performance of actual antennas. First, the computer modeling programs use a level ground, which is not the terrain for many hams in the U.S. Hilly or mountainous terrain may vary antenna patterns by a significant margin. Second, the patterns assume a level antenna wire, with none of the droops, zig-zags, and other shape imperfections we mentioned earlier. However, none of those imperfections will have a significant negative effect on antenna performance. They will just shift a lobe or two by a little bit.
The best use of patterns like these is to establish some very general expectations about antenna performance. For example, we might expect an azimuth pattern of the 100' version of the doublet to have only 3 lobes on each side of the wire; and the 67' long version would show only two lobes on each side. However, if the antennas are all at the same height, we would expect the elevation patterns to be similar for each band.
However, here is a list of things that can happen to your antenna system that can adversely affect performance:
1.  Antenna:
          wire corrosion
          wire breaks inside strong insulation
          wear on support ropes or lines
          wear or corrosion of solder joints at the feedpoint
2.  Feedline:
          build-up of dirt
          hidden breaks
          changes in the nearby metals
3.  Antenna Tuner:
          dust, dirt, tarnishing of the coil
          dirt between capacitor plates
          dirty switches
All of these items assume that we have taken generally good care of everything.
The cure for all these evils is a regular maintenance program to examine and clean everything before it causes trouble. In addition, items showing wear can be replaced while the situation is under control, not during a contest or field day.
Good maintenance begins at the time of building the antenna and feedline system. Raising the antenna should also mean that it can be lowered. Hence, the use of pulleys, eye-bolts, and other means of passing the rope or support line is essential to a good antenna installation. Passing the rope over a crotch of a tree is a good method for finding the rope immovable in a couple of years, as the tree grows right over it.
Be certain that all connections between the feedline and the antenna wire are mechanically solid and well soldered. Do not rely on solder for the mechanical connection. In some parts of the country, it may be useful to seal the solder connection, since chemical salts in the air may break down the solder joint.
Even if you use a ladder-line ţgrabberţ device, be sure that there are no sharp edges against which the line may rub and break. In fact, the first maintenance should be about 4 months after initial construction as a check to ensure that all work was well done. Thereafter, a check at least once a year is wise.
Many hams wax antenna wires with one of the automotive waxes designed to go on metals. They also contain cleaners that remove dirt, grime, and some tarnish to the wire during reapplication.
Similar measures also apply to feedlines. Some doublet users have noticed that the antenna tuner settings require a little change during rain showers. While the water on the line may not create significant losses, it nevertheless pays to clean the feedline during a regular maintenance session. Again, automotive polish applied to vinyl-coated feedlines not only helps shed water, but also cleans dirt build-ups from particulates and chemicals in the air.
One often neglected area of maintenance is the point where the line enters the house. Because the temperature may be vastly different indoors relative to outdoors, the line and its insulation can undergo stress and wear. If the passage is filled initially with fiberglass or a similar insulation to protect from drafts, the material can become packed with dirt and insects. Periodically changing the insulation-- and even the line section in this area--can help maintain the antenna system at full efficiency.
The antenna tuner also needs a good periodic cleaning to remove dust and coatings that accumulate just from sitting in the living environment. A fine bottle-type brush (electric shaver type?) is good for catching dust between capacitor plates, as is some contact cleaner on a lintless rag. However, be sure the cleaner is non-toxic.
Coils require special care. Many have tinned or silvered coatings, and tarnish can be a problem. It can even degrade the contact between the turns of a rotary coil and the wheel that contacts the turns. Try to clean the coil with non-abrasive materials to avoid removing the finish, since the copper underneath may tarnish even faster.
While doing a general cleaning, inspect all connections. A good- looking solder joint to a coax connector might reveal a weakness after a period of time. Switch contacts may need cleaning and even replacement. Tightening all chassis and case screws (unless the instruction book explicitly says not to in some instance) is usually good practice, especially those screws that form part of the ground common of the tuner.
Instructing newcomers in good maintenance practices is essential in this world in which almost all consumer electronics are marked ţDo not open, No user parts inside.ţ The entire amateur station represents a new level of responsibility for the licensee. He or she is responsible for the care and upkeep of the equipment to ensure that it meets technical specifications set by regulation. The only way for many to meet this need with respect to transceivers is to send them back to the factory for periodic servicing. However, almost every ham is able to perform many of the maintenance needs of the antenna system. Setting good habits as the new ham walks into the door of his or her new shack is to set a good habit for a lifetime.
The all-band doublet is so deceptively simple an antenna that it seems to beg for neglect--until it quits working or falls down. Yet, a regular schedule of maintenance once or twice a year can make the antenna operate reliably for many years.
Of course, if the antenna does become a victim of weather, falling
trees, or other accidents, replacing it is a straightforward exercise,
made easier by having done it once already. Not only that, but
replacement is easy on the budget. In fact, it may be impossible to
find an antenna that does so much for so little as the all-band
doublet.
From Proceedings of the 1998 National ARRL Education Workshop, (Newington: ARRL, 1998), pp. 39-46 © L. B. Cebik, W4RNL. Data may be used for personal purposes, but may not be reproduced for publication in print or any other medium without permission of the author.