MODELING AND UNDERSTANDING SMALL BEAMS
PART 1: THE FOLDED X-BEAM
Between miniature loop antennas and full size arrays exists a special class of antennas: the small beams. Small beam antennas are intriguing and misunderstood. To some, they represent the search to achieve something for nothing. Like lotteries and sweepstakes, they receive as much moral disapproval as technical discrediting. To others, they are a necessity, since something is at least better than nothing. Space and money are the chief motivations to build a mini-beam of one or another design.
Quite frankly, for me, small beams are fun. Many types of small beams have received only casual empirical development. What their performance limits may be remains a mystery in the literature. Here, computer modeling can offer a service by estimating with buildable accuracy antenna gain, front-to-back ratio, overall azimuth and elevation patterns, and feedpoint conditions. For under $30 per antenna, with hardware store parts, I can test what modeling tells me ought to be the case.
In this series, we shall look at several contemporary small beams, including the folded X-beam, the modified Moxon rectangle, the linear-loaded Yagi, fan-element Yagis, shrunken quads, capacity-hat Yagis, ZL-Specials, and the parasitic EDZ. The last is admittedly not small in element length, but it is short and cheap. Our purpose is not to recommend any of the designs. Rather, the goal is to understand what each design can and cannot do. Only then can one assess what each beam's place may be in the scheme of amateur antennas.
Small beams appeal to the builder because they are manageable. They are "hands-on" devices, not set and forget store items. On 10 meters, where all the beams in this series were modeled and tested, dimensions are reasonable as one-person projects. Moreover, the results are generally scalable down to at least 20 meters with little adjustment. Moreover, since 10 meters is closed part of the day, even during sun spot maxima, one can test the antennas without causing QRM. A temporary mast about 20-feet long, a method to prop it securely but not permanently, some feedline, a small rig (like the HTX-100 I use), a good noise bridge and SWR meter, and a reliable helper (like N4TZP, my XYL) are all one needs to try out a few 10-meter mini-beams.
However, a good modeling program makes an even better beginning. It permits one not only to reject numerous ideas that simply are not worth the effort of building, but as well it puts dimensions close enough to reality so that adjustments go in the right direction the first time. Most of all, a modeling program allows a relatively rapid investigation of the most significant antenna properties, which produces an understanding of the antenna to be tested. This series will contain extensive notes on the modeling aspect of these investigations to show the evolution of various designs. These notes may also prompt kindred spirits to try some directions not taken here and to uncover some possibilities that have eluded me. Modeling data in this series will often be given for free space (to permit ready general comparisons), at 20 feet (a common height for portable antennas), and for 35 feet (a common permanent installation height).
There are several general propositions about small beams that underlie both our knowledge and our mythology:
1. Small beams generally have narrower bandwidths than full size beams. This proposition is true, but it is not always the limiting factor that we may think it is.
2. Small beams present complex construction problems. The truth of this proposition depends upon the sort of antenna construction with which you are comfortable. If you have only slipped tubing in and out of other tubing in normal Yagi construction fashion, then some closed geometry beams will seem ungainly at first sight. However, if you look at plumbing and electrical supplies and see antenna possibilities, then small beams offer a pleasant challenge. But, admittedly, a few require careful construction.
3. Small beams give reduced performance. In its absolute form, this proposition may be the most mythical of all. At design center, some small beams can outperform their full size brethren in one or another specification, with only a small sacrifice in other areas. For example, some of the beams in this series--all two-element parasitic types--will outperform the standard two-element Yagi in front-to-back ratio with little loss of forward gain over a small bandwidth. And, for certain operators, this property may be just the one desired. This fact does not mean that the small beams are superior, for many have other deficiencies. Rather, every beam must be measured against a particular set of applications.
As a standard of comparison, let's present a well-known 2-element Yagi with a driven element and a reflector. Using 1-inch aluminum tubing, the driven element is 16-feet long, the reflector is 17.5 feet long, and the spacing is 4.25 feet.(1) The resonant feedpoint impedance is about 32 ohms at 28.5 MHz. What makes this antenna a good standard of comparison for understanding the mini-beams in this series is that it is well-behaved. As Fig. 1 and Table 1 demonstrate, the beam maintains its characteristics across a 1 MHz span of 10 meters with excellent consistency. Free space forward gain varies by about 0.76 dBi, while the front-to-back ratio varies by less than 1 dB. Variations over real ground at 20 feet and 35 feet are somewhat greater, but still quite minor.
Wide-Band 2-Element Yagi Performance
Frequency (MHz) 28.00 28.25 28.50 28.75 29.00
Free Space
Gain (dBi) 6.7 6.5 6.3 6.1 5.9
F-B ratio (dB) 10.3 11.0 11.2 11.0 10.6
Impedance (R�X) 24 - 17 28 - 8 32 + 1 36 + 9 40 + 18
20' high
Gain (dBi) 11.7 11.5 11.3 11.2 11.1
F-B ratio (dB) 13.3 12.2 10.9 9.7 8.8
Impedance (R�X) 27 - 21 30 - 13 34 - 5 37 + 2 39 + 10
35' high
Gain (dBi) 12.0 11.9 11.7 11.5 11.4
F-B ratio (dB) 12.7 13.7 13.5 12.6 11.5
Impedance (R�X) 27 - 17 31 - 8 35 + 0 40 + 8 43 + 15
Note: Performance figures for 20 and 35 foot heights were taken over average ground (also called medium
earth: dialectric constant = 13, conductivity = 5 milliSiemens/meter). See text for antenna dimensions and
material.
Table 1. Performance characteristics in free space, at 20 feet, and at 35 feet of a wide-band 2-element Yagi
using a driven element and a reflector.
The antenna's performance in terms of raw gain and front-to-back ratio at design center is modest. However, 6.3 dBi forward gain (free space) and 11.2 dB front-to-back ratio are quite serviceable figures compared to the free space gain of a wire dipole (about 2.15 dBi). You can design Yagis for another dB of forward gain and alternatively for a somewhat greater front-to-back ratio, but only at the expense of bandwidth. Thus, the given design seems well suited to its role as a standard of comparison. With it in mind, we can turn to the first of our small beams.
In Volume 1 of The Antenna Compendium, Brice Anderson presented dimensions for a folded X-beam for the upper HF bands.(2) His empirically derived antennas have received both praise and censure within amateur circles.(3) Unfortunately, much of the criticism has stemmed from one remark born of enthusiasm: the X-beam rivals a 3-element beam in performance. I have known some 3-element tribanders of older design which might fit the remark, but newer designs likely reduce the claim to approaching the performance of a full-size 2-element beam.
Anderson built his X-beams using a driven element and a director element to match as closely as possible a 50-Ohm line without additional components. His aim was a design that home builders could replicate and use reliably across a chosen band. In achieving this goal, he produced a 2-element parasitical beam with less than its full potential for gain and front-to-back ratio. Nevertheless, the X-beam as Anderson presented it may well serve hams operating in very limited space. With dimensions approximately a quarter wavelength on a side, the X-beam is a compact way to achieve some gain and some front-to-back ratio in a compact arrangement. Indeed, those who build X-beams generally do not seek to equal the performance of a 3-element Yagi, but only to achieve an improvement both in gain and in signal rejection relative to fixed-position dipoles. The X-beam will certainly do that.
Computer modelling via MININEC offers us a chance to understand better some of the characteristics of the X-beam. Due to its complex geometry, full of acute angles, it is not the simplest beam to model. However, the auto-tapering feature of ELNEC 3.02 permits some reliable looks at X-beam performance under various conditions.(4) Similar work can be done using the bent-wire correction feature of AO 6.0, if one uses enough wire segments.(5) The X-beam is worth the effort to examine, especially if one wants to get more than minimal results from it.

Fig. 2. TRU-X beam configuration and azimuth pattern at 35' above average earth.
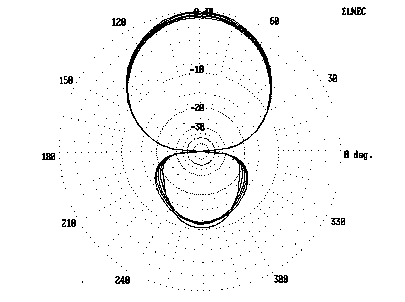
Where Does the X-Beam Come From? Any two wires, one of which is fed, will show some degree of parasitic element properties if they are not too dissimilar in length, not too far apart, and not at right angles to each other. Paralleling elements is efficient, but not necessary. One can construct a true X-beam (or TRU-X), as shown in Fig. 2, and alter the dipole pattern to show a bit of gain in a favored direction. With over 3 dB gain above a dipole in the same setting (35' in Fig. 2), the TRU-X might be a useful beam were it not so large and were the pattern something less than a 3-leaf clover. The side lobes are only 4 dB down from the main lobe, inviting confusing QRM.(6)

Fig. 3. Roman-X beam configuration and azimuth pattern at 35' above average earth.
Now, let us bend back the ends of the X-elements to form a Roman X, as shown in Fig. 3. This simple act pushes the side lobes toward the back, reduces them, and increases forward gain. A comparison of the patterns in Fig. 2 and Fig. 3 reveals the differences. Forward gain can improve by up to 1 dB over the TRU-X, while the side lobes are down 7 dB from the main lobe. However, as Table 2 shows, the Roman-X is a big antenna relative to these marginal improvements. Both the TRU-X and the Roman-X produce beams are, in general, about the same breadth as, but unequal in performance to, a standard 2-element Yagi. Table 2 compares the dimensions for the X configurations and for the Yagis.
                          Performance and Dimensions of the Tru-X and Roman-X Antennas

Performance (in free space):

Antenna                Gain           Front-to-Back         Band width             Source Impedance
                       (dBi)          (dB)                  (degrees)              R +/- X

Tru-X
  Max. Gain            5.5            16.4                  58                     42.8 +  3.1
  Max. F-B             5.2            29.5                  62                     51.8 + 2.5

Roman-X
  Max. Gain            6.3            12.1                  58                     41.2 + 27.3
  Max. F-B             5.7            23.1                  62                     59.8 + 25.3


Dimensions:

Antenna                  DE                    Dir                  Total Side-side       Total Front-back
                       Length                Length                     Length                Length

Tru-X                   20.6'                 20.4'                     14.5'                 14.5'
                       DE = 2 x Arm          Dir = 2 x Arm
Roman-X                 21.4'                 20.4'                     17.4'                  9.8'
               DE = 2 x (Arm + Tail)         Dir = 2 x (Arm + Tail)

Typical 2-element Yagis
  DE + Dir              17.0'                 15.6'                     17.0'                  4.0'
  DE + Ref              16.0'                 17.5'                     17.5'                  4.3'

X-Beam                  6.9' + 3.8'           6.9' + 3.3'                9.8'                  9.8'
               DE = 2 x (Arm + Tail)         Dir = 2 x (Arm + Tail)

Table 2.  Dimensions of Tru-X, Roman-X, DE + Dir Yagi, DE + Refl Yagi, and X-beam antennas.
If we bend the ends of the Roman-X wires still further back until the director ends and driven element ends point at each other, we can retain the performance of the Roman-X in a square only slightly greater than a quarter wavelength on a side, as shown in Fig. 4. This is the X-beam Anderson presented in Volume 1 of Antenna Compendium, and Fig. 4 shows the dimensions he recommended for 10 meters.(7) The question is whether it is worth building such an antenna, on the assumption that a 3-element Yagi is out of the question at one's location.

Fig. 4. Configuration and terminology of the X-beam.
Basic Anderson Performance: In order to answer the question, I constructed numerous computer models of Anderson's design and variations upon it. In the process, I discovered some general patterns of theoretic interest, as well as some other patterns and progressions that pointed to performance improvements. The end result was a better understanding of what X-beams could and could not do and a better sense of what I should and should not do in playing with them. Throughout, I shall presume construction methods similar to those used by Anderson and retain his terminology, calling the angular tubing the arms and the bent-back wire ends the tails.

Fig. 5. Representative azimuth pattern of the X-beam, configured for best match to 50-Ohm coaxial cable.
The initial stage in the work was to see what MININEC might tell about Anderson's beam. I modeled his dimensions for 10 meters (28.5 MHz), using 0.5" diameter aluminum tubing and #18 wire. The result was a beam with modest gain over a real dipole in free space, at 20 feet (a common height for portable beams on 10), and at 35 feet (a common 10-meter fixed installation height). The results appear in Table 3, with Fig. 5 showing a representative azimuth pattern for the "best match" configuration at 35 feet above average earth (dielectric constant 13, conductivity 5 mS/m). Three aspects of the figure are especially notable. First, the gain over a dipole in the same position is less than 3.5 dB and not up to average 2-element Yagi figures. The front-to-back ratio is also modest, but odd. The side lobes quartering to the rear are less than 10 dB down from the main lobe, which limits signal rejection in these directions. These rearward lobes will remain, no matter how much front-to-back ratio is achieved in the 180-degree direction. Third, the input impedance is in the mid-30-Ohm range, which permits a direct coax connection with an SWR ratio of under 2:1. One can either live with or cancel the remnant reactance at the feedpoint with not too much trouble.
Properties of a 10-Meter X-beam
Antenna A: Basic Anderson design: Arms 0.5" dia., 6.92' long, Tails #18, DE = 3.79', Dir = 3.29'.
Environment Gain Take-Off F-B Ratio Beam width Source Impedance
(dBi) Angle (dB) (degrees) R � X
Free Space 5.5 -- 20.9 66 36.3 - 19.2
20', ave. gnd. 10.7 24 11.8 74 38.6 - 12.1
35', ave. gnd. 10.9 14 17.1 68 34.3 - 16.1
Antenna B: +0.2' to Tails: Arms 0.5" dia., 6.92' long, Tails #18, DE = 3.99', Dir = 3.49'.
Free Space 6.6 -- 13.0 62 20.3 + 0.4
20', ave. gnd. 11.6 23 24.2 66 22.9 + 1.9*
35', ave. gnd. 11.9 14 15.4 62 20.3 + 1.9
Antenna C: +0.3' to Tails: Arms 0.5" dia., 6.92' long, Tails #18, DE = 4.09', Dir = 3.59'.
Free Space 6.9 -- 7.0 58 14.1 + 15.1
20', ave. gnd. 11.9 23 10.6 62 15.3 + 15.1
35', ave. gnd. 12.1 14 7.9 60 14.3 + 15.6
* Dimensions of antenna B were optimized for a 20' height above average earth. Free space models require
adjustment for low heights and require real earth models.
Performance figures for 20 and 35 foot heights were taken over average ground (also called medium earth:
dialectric constant = 13, conductivity = 5 milliSiemens/meter).
Table 3. Properties of a 10-meter X-beam in free space and at 20 and 35 feet over medium earth.
Attempts to improve performance led to some alteration of the element dimensions, while adhering to Anderson's advice to keep the tail lengths a certain amount different--on 10 meters, 6 inches. This procedure lent consistency to all my models, which allowed the patterns and progressions to appear more easily. My first attempts lengthened all the elements by 0.2 feet per end. As Table 3 shows, the resulting antenna increased in gain by a small but useful amount. However, the front-to-back ratio increased by much more. Nonetheless, the rearward side lobes did not materially shrink. Fig. 6, a representative azimuth pattern, displays the side lobes quite well. Finally, the input impedance decreased into the mid-20-ohm range. This antenna promised improved performance at the cost of requiring a 2:1 matching system.
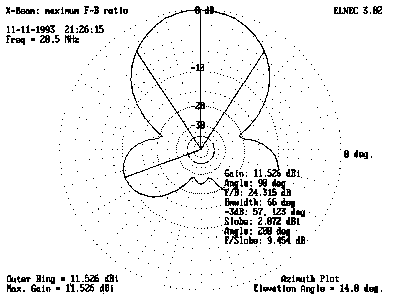
Fig. 6. Representative azimuth pattern of the X-beam, configured for maximum front-to-back ratio.
Increasing the tail lengths by 0.3 feet over the original Anderson dimensions produced further changes in X-beam characteristics. Gain increased to equal or surpass average 2-element Yagis. However, as Table 3 shows, the front-to-back ratio decreases dramatically. Yagis with 2 elements show a similar phenomenon when optimized for maximum gain. Fig. 7 shows a representative "max gain" X-beam azimuth pattern. Finally, the source impedance dropped into the mid-teens range.

Fig. 7. Representative azimuth pattern of the X-beam, configured for maximum gain.
None of these models represents the absolute peak of coax match, front-to-back ratio, or gain that might be obtained with an X-beam. Rather, they are models designed to find out about where various parameters end up with changes of element length. Initial observations of the data in Table 3 suggested that with the X-beam, one cannot wholly rely on a free-space model. Modeling over the anticipated real terrain of the antenna is a must. Since MININEC calculates the source impedance over perfect ground, not the modeled ground, slight differences between the models and reality are the order of the day.
Constructing an X-beam without loading requires a tuning process that opposes what we normally do. If we wish to move from best 50-Ohm match to maximum front-to-back ratio, we must lengthen the element tails, a process that requires more forethought than merely snipping dipole wires.
Loading the X-Beam: If we could achieve some desirable improvements in X-beam performance by changing element lengths, the next question was whether similar results might be obtained by loading the director. This idea came from W2EEY's X-beam that I encountered in Antenna Roundup, Vol. 2.(8) Table 4 shows some initial results. Using the original Anderson dimensions, we can achieve the performance of the maximum front-to-back ratio model and the maximum gain model by placing a series inductor of the proper reactance at the center point of the director. Although the models use a lossless inductor as the loading element, reasonably high-quality coils should not reduce the performance figures significantly.
Properties of a 10-Meter X-beam with an Inductively Loaded Director
Antenna: Arms 0.5" dia., 6.92' long, Tails #18, DE = 3.79', Dir = 3.29'.
Environment Dir Xl Gain Take-Off F-B Ratio Beam width Source Impedance
(Ohms) (dBi) Angle (dB) (degrees) R � X
Antenna A: Anderson best 50-Ohm match design
Free Space 0 5.5 -- 20.9 66 36.3 - 19.2
20', ave. gnd. 0 10.7 24 11.8 74 38.6 - 12.1
35', ave. gnd. 0 10.9 14 17.1 68 34.3 - 16.1
Antenna B: Maximum front-to-back ratio design
Free Space + 6 5.9 -- 27.6 64 29.7 - 19.6
20', ave. gnd. +12 11.4 24 24.0 68 26.1 - 15.7
35', ave. gnd. +10 11.5 14 27.2 64 24.9 - 16.6
Antenna C: Maximum gain design
Free Space +23 6.8 -- 6.9 58 13.1 - 9.9
20', ave. gnd. +23 11.7 24 10.3 62 14.3 - 10.2
35', ave. gnd. +20 12.1 14 10.3 60 15.5 - 11.8
Note: Loading permits each antenna to be optimized for each environment.
Performance figures for 20 and 35 foot heights were taken over average ground (also called medium earth:
dialectric constant = 13, conductivity = 5 milliSiemens/meter).
Table 4. Properties of a 10-meter X-beam with an inductively loaded director in free space and at 20 and 35
feet over medium earth.
There is no need to display further azimuth patterns from this point onward, since one of the progressions began to show itself at this point. Best match, maximum front-to-back, and maximum gain patterns each look alike, whatever means are used to arrive at them. Moreover, the resistive component of the source impedance remains in the same ball park for each category: the mid-30s for best match, the mid-20s for maximum front-to-back ratio, and the mid-teens for maximum gain.
Inductive loading is usually less preferable than capacitive loading, wherever a choice is available. Therefore, following W2EEY's lead, the next set of models lengthened the director tails to require a capacitive load for each X-beam category. By increasing the capacitive loading, one can move from best match through maximum front-to-back ratio to the maximum gain level. At the same time, one passes smoothly through the three source impedance ranges. The result is an X-beam that permits adjustment with the turn of a knob.
Anderson recommended a constant length difference between driven element and director tails. However, since a variable capacitor is capable of tuning the system to the desired characteristics and since the driven element reactance remains stable across the span of adjustments, we may depart from Anderson's empirically-derived constraint and resonate the capacitively loaded X-beam. Table 5 shows in finer detail the result of returning the driven element to an approximately resonant length while leaving the director long for capacitive tuning. The results are precisely comparable to those for all other models.
Properties of a Resonant 10-Meter X-beam with a Capacitively Loaded Director Antenna: Arms 0.5" dia., 6.92' long, Tails #18, DE = 3.99', Dir = 3.79'. Dir Load Gain F-B Ratio Band Width Source Impedance Side Lobe Side Lobe -Xc (dBi) (dB) (degrees) R � X Angle (deg) Ratio (dB) Environment 1: Free Space -15 6.9 6.9 58 13.7 + 8.1 100 (est) -9.0 (est)n. 1 -20 6.8 10.1 60 17.0 + 4.4 101 -9.1 -25 6.5 14.4 62 21.1 + 1.5 105 -9.4 -30 6.2 21.1 64 26.2 - 0.3 108 -9.4 -35 5.9 51.5 66 31.4 - 0.9 112 -9.4 n. 2 -40 5.6 22.2 68 35.6 - 0.4 115 -9.2 -45 5.3 16.8 68 39.7 + 0.8 118 -9.0 -50 5.0 13.9 70 43.1 + 2.3 121 -8.7 n. 3 Environment 2: 20' above average earth, takeoff angle 23 degrees -15 11.8 10.4 62 14.9 + 8.2 101 -9.2 n. 1 -20 11.8 16.3 66 19.1 + 5.1 105 -9.4 -25 11.5 33.0 68 23.9 + 3.5 109 -9.4 n. 2 -30 11.3 21.2 70 28.9 + 3.4 114 -9.2 -35 11.0 15.2 72 33.3 + 4.5 118 -8.8 -40 10.8 12.2 74 37.0 + 6.5 123 -8.4 -45 10.5 10.2 74 39.7 + 8.9 127 -8.0 n.3 Environment 3: 35' above average earth, takeoff angle 14 degrees -15 12.2 7.8 60 13.9 + 8.7 100 -9.0 n. 1 -20 12.1 11.6 62 17.2 + 5.4 102 -9.2 -25 11.8 16.8 64 21.3 + 3.1 106 -9.5 -30 11.5 24.3 66 25.5 + 1.8 110 -9.5 n. 2 -35 11.2 22.1 68 29.7 + 1.6 113 -9.3 -40 10.9 16.9 68 33.4 + 2.2 117 -9.1 -45 10.6 13.8 70 36.6 + 3.5 120 -8.8 -50 10.5 11.8 72 39.2 + 5.0 124 -8.5 n. 3 Note 1: maximum gain Note 2: maximum front-to-back ratio Note 3: best coax match Performance figures for 20 and 35 foot heights were taken over average ground (also called medium earth: dialectric constant = 13, conductivity = 5 milliSiemens/meter). Table 5. Properties of a resonant 10-meter X-beam with a capacitively loaded director in free space and at 20 and 35 feet over medium earth.
In fact, the representative azimuth patterns shown in earlier figures are taken from the 35' model of this X-beam. Moreover, rearward side-lobe angles shown in Table 5 apply to all the models within a few degrees and with close matching of their level below the main lobe. Additionally, the X-beam does not lend itself to close stacking or interlacing. W9PNE confirmed my own modeling failures in correspondence: no one he knew had had any luck trying to create a compact multi-band X-beam assembly.
Changing Materials and Frequencies: Since not everyone has access to the same materials, I checked the sensitivity of the X-beam in Table 6 to variations in arm diameter and tail thickness. Increasing the arm diameter to 1" and the tail wires to #12, while preserving the dimensions of the antenna in Table 5, produced the results shown in Table 6. Those who are only used to working with linear elements, where fat equals electrically long, may be surprised to find that both the driven element and the director play short. Both require lengthening to match the antenna in Table 5. (Those who have modeled quads with wires and tubing of varying diameters will not find the phenomenon strange at all.) The requisite lengthening--on the order of 0.2' to 0.3' per tail--approaches the point of requiring slightly longer arms to keep the tails from nearly touching. In the end, varying the materials of an X-beam by any significant amount requires either a new model for a blueprint or some empirical experimentation.
Properties of a 10-Meter X-beam with Thicker Arms and Tails and with a Capacitively Loaded Director
Antenna: Arms 1.0" dia., 6.92' long, Tails #12, DE = 4.29', Dir = 3.79'.
Environment Dir Xl Gain Take-Off F-B Ratio Beam width Source Impedance
(Ohms) (dBi) Angle (dB) (degrees) R � X
Antenna A: Best 50-Ohm match design
Free Space -25 5.3 -- 15.7 70 39.9 - 2.9
20', ave. gnd. -25 10.5 24 9.6 76 39.5 + 5.3
35', ave. gnd. -25 10.7 14 13.0 70 36.7 - 0.4
Antenna B: Maximum front-to-back ratio design
Free Space -15 5.9 -- 33.0 66 31.4 - 4.8
20', ave. gnd. - 5 11.6 24 53.0 68 24.0 - 0.4
35', ave. gnd. -10 11.5 14 24.2 66 26.5 - 2.3
Antenna C: Maximum gain design
Free Space + 5 7.0 -- 6.9 58 13.4 - 4.4
20', ave. gnd. + 5 11.9 24 10.5 64 14.5 + 4.3
35', ave. gnd. + 5 12.3 14 7.7 60 13.6 + 4.8
Performance figures for 20 and 35 foot heights were taken over average ground (also called medium earth:
dialectric constant = 13, conductivity = 5 milliSiemens/meter).
Table 6. Properties of a 10-meter X-beam with thicker arms and tails and with a capacitively loaded director in
free space and at 20 and 35 feet over medium earth.
SWR Bandwidth: Developing 2:1 SWR bandwidth curves does help us determine which of the design variations will best serve a specific application. The bandwidth of the X-beam appears to be little better or worse than most antennas. Table 7 charts two models of the X-beam at 35', the first of which is the original Anderson specifications. Referenced either to the center frequency resistive component of the source impedance or to a 50-ohm cable, the Anderson design provides a broad curve within the usual 2:1 SWR limits. The curves are graphed in Fig. 8. Note that as the frequency increases, the design transitions from a "best match" condition to a "max gain" condition, with the "max front-to-back" condition occurring about three-fourths of the way through the 1 MHz spread. Although the gain and front-to-back ratio drop off seriously at the lowest end of the band, performance is quite adequate throughout most of the range. Anderson's empirical findings once more vindicate themselves, especially for the individual with limited space who needs a monoband beam for full-band use.

Fig. 8. 2:1 SWR bandwidth graph for the Anderson 10-meter X-beam in Table 2.
X-Beam Bandwidth Characteristics
Antenna: Arms 0.5" dia., 6.92' long, Tails #18, DE = 3.79', Dir = 3.29' @ 35'
Design center: 28.5 MHz (original Anderson design)
Frequency
(MHz) 28.00 28.25 28.50 28.75 29.00
Gain (dBi) 9.9 10.3 10.9 11.5 12.0
Front-to-back
ratio (dB) 8.9 11.6 17.1 33.8 13.1
Beam width
degrees 72 70 68 66 62
Source Impedance
R +/- X 42.1 - 26.1 39.4 - 21.5 34.3 - 16.1 27.2 - 8.4 19.5 + 3.1
SWR (50)1 1.797 1.706 1.710 1.913 2.569
SWR (Ctr)2 2.020 1.808 1.594 1.433 1.766
Antenna: Arms 0.5" dia., 6.92' long, Tails #18, DE = 3.99', Dir = 3.79' @ 35'
Director load (Xc) = -30; Load = 1.86�10-10F (186 pF) @ design center: 28.5 MHz
Frequency
(MHz) 28.00 28.25 28.50 28.75 29.00
Gain (dBi) 10.3 10.9 11.5 12.1 12.1
Front-to-back
ratio (dB) 11.6 16.9 24.3 12.0 5.5
Beam width
degrees 72 68 66 62 58
Source Impedance
R +/- X 37.0 - 12.9 32.3 - 6.7 25.5 + 1.8 18.4 + 14.0 13.3 + 29.5
SWR (50)1 1.524 1.596 1.961 2.959 5.141
SWR (Ctr)2 1.744 1.390 1.074 2.030 4.800
1 SWR (50) gives the calculated SWR relative to a 50-Ohm feedline.
2 SWR (Ctr) gives the calculated SWR relative to the approximate center design frequency impedance (25.5
Ohms).
Table 7. Frequency-related properties of the original Anderson design and of an X-beam optimized at 28.5 MHz
for maximum front-to-back ratio.
Using the capacitively loaded antenna at 35' of Table 5, I converted the load reactance at 28.5 MHz into a capacitance for insertion into the model as a LaPlace figure. The results of a selective frequency sweep appear in Table 7 and are graphed in Fig. 9. Again, the lower line references the SWR to the center frequency, while the upper line references it to 50 ohms. The figures suggest that the 2:1 SWR bandwidth exceeds 750 kHz on 10 meters. However, most of the bandspread lies below the design center. Therefore, when planning an antenna for a specific bandspread, the designer should center the model about two-thirds to three-fourths the way up the spectrum. Like the Anderson design, this X-beam changes its characteristics from a "best match design" through a "max F-B" design to a "max gain" design. If a particular characteristic is especially needed at a specific frequency, one must design for that frequency and live with the results at other frequencies.

Fig. 9. 2:1 SWR bandwidth graph for the director-loaded 10-meter X-beam in Table 5.
Because a folded X-beam for 10 meters is under 10 feet on a side, garage construction is easy. A 10-pound package is easy to achieve, which means that a simple mast will hold the antenna, and antenna raising is a simple matter. At the risk of repeating some of what Brice Anderson has said about building an X-beam, let's look at some possibilities.
Basic Structure: For a number of reasons relating to the bandwidth of the antenna, "permanent" X-beam installations should consider using Anderson's original recommendations for dimensions. Although the rear lobe of the antenna will be wide and gain will not be maximum, matching the antenna to a 50-ohm cable and transmitter is vastly simplified. In fact, a simple sleeve balun (such as the W2DU model or those available through Radio Works) may be the only device between the coaxial feedline and the antenna terminals or connector.
Refer to Fig. 10 for some construction details. Although this figure shows elements relevant only to a hilltopper version of the X-beam, it also reveals the basic construction technique for all X-beams. For 10 meters, a plywood plate 18 inches on a side supports the X members. Scrap plywood 3/8 to 1/2 inch thick will easily bear the antenna load. My technique for attaching the antenna to the mast is to cut a circular hole in the plywood at the exact center to admit an 18-inch length of 1-inch nominal diameter Schedule 40 PVC. Two 2-inch L-brackets support the plate. Stainless steel bolts (#10 x 2") run through the pipe to clamp the L-brackets, while 1-inch #10 bolts hold the plate. This method has proven superior to butting the pipe against the plate in terms of getting a true 90-degree angle.
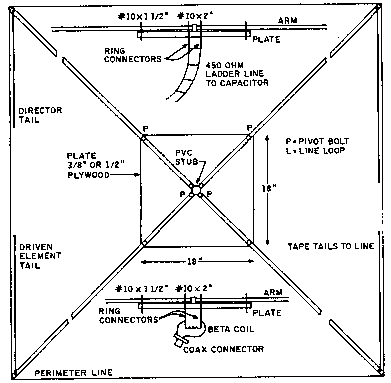
Fig. 10. Construction details of a collapsible hilltopper X-beam with beta match and remote director tuning.
Drill the plywood for the X-members, using 2-inch #10 bolts for the fasteners closest to the mast stub and 1 1/2-inch #10 bolts about a half inch from the plate corners. (All hardware is stainless steel, now more readily available in hardware stores.) I used a drill press to drill the tubing, keeping the two holes per piece aligned by dropping a long nail through the first hole and matching it to a reference vertical. The only other holes needed are at the X-member far ends, about 1/4-inch in for attaching the perimeter line and the tails.
Disassemble the basic X and weather treat the plywood. Spar varnish has been a standard, but scrap plywood often admits moisture through gaps in the edge. A more weather-proof alternative is to fiberglass epoxy the board, using epoxy-soaked glass cloth strips to cover the edges. A simple boat repair kit will serve several beams. Before coating the board, enlarge all holes slightly. Then heavily coat their edges. When everything is set, use the correct drill bit to reestablish bolt holes and some sandpaper to refit the mast stub. An orbital sander (or heavier) with course paper will make quick work of smoothing and leveling the surface. The result is weather-proof nearly forever.
When the hub and X members are reassembled, run a perimeter line of 1/8-inch nylon rope or cord, using the end bolts as attachment points. Solder ring connectors on the tails and place them on the end bolts with an additional nut. Add very short leads (with ring connectors) to a coax connector and attach the ring connectors to the underside bolt extensions for the driven element, using additional #10 nuts. Add a shorting bar across the bolt extensions of the director.
My model bolts the mast stub inside a 3-foot length of 1 1/4-inch PVC, which then slips over the main mast. A pair of heavy sheet metal screws locks the larger diameter stub to the mast. Alternatively, the larger diameter stub can be cut to match the length of the inner stub and the pair locked in a rotator.
Although the result is light, it is mechanically sound. My test beams have survived winds in excess of 45 miles per hour without damage. The perimeter line dampens vibrations and reduces metal fatigue. Rain cannot reach the coax connections on the underside of the plate. The end result is simple and long-lived.
Adjustment: Since the lowest obtainable SWR does not coincide with the antenna's best performance, careful adjustment is required. Adjusting the tail lengths of the director will affect the resistive component of the driven element impedance, while changing the tail length of the driven element will alter its reactive component. If the center frequency is to be in the lower portion of the 10-meter phone band, alter the tail lengths so that the lowest SWR (whatever its value) is just about at the 28.0 MHz point. Then alter the driven element tail lengths to reduce the SWR at the center frequency further by bringing the driven element to resonance. Since initial adjustments may require lengthening elements, do not install ring connectors until the tail length is set.
A Hilltopper Version of the X-Beam: The ability to capacitively load the director for optimum performance suggested that the folded X-Beam would make a compact collapsible antenna for portable hilltop operations. Fig. 11 shows the theoretic coincidence of five patterns across the first MHz of 10-meters with the antenna director adjusted in each case for maximum front-to-back ratio at a 20-foot height level over medium ground, the average conditions for my portable operations.

Fig. 11. Azimuth patterns of the hilltopper X-beam at 20' from 28.0 to 29.0 MHz.
Since local hardware stores carried only 3/4-inch, 0.050-inch wall thickness aluminum tubing, I remodeled the antenna for this material. With 6' 11" arms, the director and driven element tails became functions of the tuning and matching system. Since a beta match requires driven element shortening, its tails worked out to be 3' 11" long to provide a requisite 25 ohms of capacitive reactance. The director element had to be lengthened so that the tuning capacitor could electrically shorten it; 4' 1" tails provided for this factor. (Note: despite that fact that the physical length of the driven element is shorter than the parasitic element, the electrical lengths are reverse and the beam remains a driven element-director arrangement.)
Beta matches are easily calculated from information in the ARRL Antenna Book.(9) I set 25 ohms as the desired feedpoint impedance, since this is close to optimum for maximum front-to-back performance from the antenna. A beta match was then calculated for a 2:1 reduction in impedance. Coil construction utilizes data from recent editions of the ARRL Handbook(10). The coil required a 50 ohm inductive reactance, which works out to about 0.28 �H, or 6 turns spaced over 3/4 inch with a 1/2 inch diameter, using #12 wire.
Antenna construction is identical to that described for the "permanent" model, with only a few changes to accommodate collapsing the antenna and adding the tuning and matching elements. First, the beta-match coil has ring connectors on its very short leads and connects across the driven element inner bolt extensions. Second, a half wavelength (adjusted for velocity factor, about 16') of 450-ohm ladder line attaches to the director bolt extensions in place of the shorting bar. At the other end of line, which is within easy operator reach, are two pin jacks. The tuning capacitor has pin terminals to mate with the jacks. The line is spaced from the mast by plastic spray can tops with four punched holes. Cable ties hold the tops to the mast every few feet, and smaller cable ties hold the line to the tops.
Every use of the antenna sacrifices a few cable ties during disassembly. However, the process of putting up and taking down the remote tuning system is quick. The capacitor goes into a protective box when not in use, and the line (with caps attached) rolls up semi-neatly.
The bolts marked "P" on Fig. 10 are pivot bolts; they are loosened for antenna transport and storage. The others are removed to free the arms to pivot and then replaced in their plate holes for storage. The perimeter line is looped over the arm point marked "L" and removed when the antenna is not in use. The entire assembly is then pivoted so that all arms point the same way. Use care not to distort the beta match inductor. Fold the tail lines neatly along the lengths of the nestled arms. The resulting compact mass fits in my hatchback, with a tape-wrapped bundle of four 5-foot sections of TV mast and a small box for the capacitor and line. Guy rope (and tent pegs for use when no trees are handy) completes the collection of antenna materials.
Adjustment: Using the antenna is simply a matter of putting it up and tuning the remote director capacitor for minimum SWR. More accurately, SWR minimum is optimum at the design center frequency only. Below center frequency, use slightly less capacitance than for absolute minimum SWR (within the usual 2:1 transmitter limits) and above center frequency, use slightly more. These guidelines are a function of the complex resistance-reactance combinations that occur off center frequency and the desire to hold the antenna at the maximum front-to-back ratio point.
Initial adjustment is similar to the procedure used for the permanent model. Tune the capacitor for the lowest SWR at the center frequency and then trim the driven element tails for a further drop.
Variations in materials can create significant differences from modeling figures. For example, the hilltopper model used plastic covered speaker wire as a convenience in cutting identical tails. However, this material yielded tails that were electrically long for both elements. (Only a very small part of this excess can be attributed to the modeling limitations of MININEC, since the segment lengths at the apex are very short when properly tapered.) I anticipated a need for a capacitor covering a range of 10 to 45 ohms capacitive reactance (about 125 to 570 pF) to tune the range from 28 to 29 MHz. With the wire used, a 100 pF variable capacitor covered the resultant 80 to 220 ohm range (25 to 70 pF).
The tails also required 6 inches of pruning each to place the SWR curve well within the desired band. However, the result was a curve that went below 1.15:1 at 28.300 MHz and rose to 1.5:1 at 28 MHz and to 1.9:1 at 29 MHz. Local point-to-point contacts verify the pattern as generally in accord with the shape shown in Fig. 11. Performance is detectably better than with a reference dipole placed on the same mast, with the reasonably sharp null to the rear being more pronounced than the forward gain.
This goals of this edxercise have been, first, to model the X-beam in order to understand its performance characteristics, and, second, to build test models to cross check theory and to enjoy some contacts. The effort does not aim either to praise or to bury the X-beam. The X-beam is a parasitic 2-element beam, but not a 2-element Yagi in either appearance or performance. However, for those with restricted budgets and space, it may provide significant improvements in performance over a dipole or other simple antenna. The X-beam lends itself to home construction, since hardware store aluminum tubing and fastenings combine with scrap wire and a few other parts to make a sturdy antenna.
One ingredient in making the decision to build an X-beam should be the pattern of usual QRM that one finds exasperating. If that QRM comes directly off the rear of a dipole, then a "max F-B" X-beam set-up may be quite helpful. However, if the QRM angles in off the rear (for example, QRM in St. Louis from New England and Florida when the beam points due west), then it may be wise to hold out for a small Yagi. Otherwise, the operator can expect similar results from the two designs.
The Yagi has long been the standard against which we compare beams. In that comparison, the X-beam has some deficiencies. First, X-beam gain only approaches the 2-element Yagi as the pattern deteriorates. Moreover, the X-beam has rearward lobes that are not eliminable and that are only about 1.5 S-units down from the main lobe.
However, the Yagi standard rests upon some operating assumptions that may not hold true for all hams. The standard presumes a desire to work one station in a favored direction, with all other signals reduced, if not eliminated. Hence, maximum forward gain and front-to-back ratio are assumed to be desirable in all cases. Of course, 5 to 7 element Yagis approach this standard well. Some amateur radio operations may not benefit from this standard. For example, local and even wide area nets may suffer from an inability to hear stations in "off" directions. Casual band sweeping in search of a rag chew may benefit from a less directive antenna while still profiting from a little gain and front-to-back ratio. In short, an antenna must be judged by reference to an application as well as to certain performance specifications.
The X-beam is flat and compact. As a cheap ($25 to $35 dollars, depending on local hardware store prices), easily built antenna that fits on a mast (instead of a tower) with a TV rotator (or simply an "Armstrong" rotator), the antenna lends itself to some home applications. Its turn radius is a little less than that of a rotatable dipole. But, for me, it comes into its own as a collasible, tunable hilltopper.
In sum, the X-beam is not a magic antenna, but neither should it be automatically discarded from the list of potentially useful ham antennas. Instead, it is an antenna with both possibilities and limitations. If its possibilities fit a particular set of needs and its limitations do not hinder operation more than those of other antennas, then it could be the right choice for some hams.
However, it is only one of several small beams that one might choose to build. Before putting an X-beam in the attic, you may want to compare it with another interesting beam that uses a closed geometry: the modified Moxon rectangle. We shall look at this unjustly neglected mini-beam next time.
1. This beam is quite obviously a minor variation of the Yagi presented by Bill Orr, W6SAI, in CQ (December, 1990, pp. 83-84). For modeling purposes, the driven element has been lengthened to resonance.
2. Brice Anderson, W9PNE, "Designing X-Beams," Antenna Compendium, Vol. 1 (Newington: A.R.R.L., 1985), pp. 64-66.
3. For some words of praise, see Michael Harris, KM4UL, "Ten for 10," 73 (April, 1991), pp. 52-56. This builder concludes that he is "confident that you'll find this to be a compact, high performance beam which is easy to build and won't lighten your pocket book. Enjoy it!" For a contrasting viewpoint, see the remark by Brian Beezley that he built into the X-Beam antenna description in AO 5.0: "By no means does this antenna live up to the claims made for it, which include performance comparable to that of a 3-element Yagi!" It is not clear whether Beezley based his conclusion on the analysis of this one model.
4. ELNEC, an enhanced version of MININEC, is available from Roy Lewallen, W7EL, P.O. Box 6658, Beaverton, OR 97007.
5. AO 6.0 is also an enhancement of MININEC (with an additional antenna optimizing feature) available (until recently) from Brian Beezley, K6STI.
6. Incidentally, it is this configuration--and not the Anderson configuration--against which Moxon recommends in his study of small antennas. Indeed, Moxon might appreciate the folded model of the X, given the many folds in some of his recommended antennas, such as the VK2ABQ square, an interesting antenna in its own right. See L. A. Moxon, HF Antennas for All Locations (R.S.G.B., 1982), pp. 81-83 and 172-175. However, he might object to the quartering rear lobes of the X-beam.
7. For those wishing to scale the X-beam to other bands, Anderson provides the following formulas. Arm length (ft) = 195/f (MHz); Total driven element length (ft) = 603/f (MHz); Driven element tail (ft) = 106.5/f (MHz); Total director element (ft) 575/f (MHz); and Director tail (ft) = 92.5/f (MHz). (Anderson, p. 64) Although the choice of materials--tubing diameter for the arms and wire size for the tails--will alter the required dimensions, #18 wire and tubing with a length-to-diameter of about 200:1 will make these dimensions a good starting point for modeling.
8. W2EEY, "The X Beam on 20," in Antenna Roundup, Tom Kneitel, K2AES, ed. (Port Washington: Cowan Publishing Corp., 1966), pp. 60-62; originally published in CQ (June, 1965). Incidentally, W2EEY's X-beam has different proportions than Anderson's design. Modeled without the all-metal support spider, from which the arms are insulated by plastic hose, the beam shows a free space gain of 6.0 dBi and a front-to-back ratio of about 26 dB in a "max F-B" model. The input impedance is low and capacitively reactive: not a good direct match to 50-ohm coax. Moreover, the director required considerable inductive loading, not the capacitive loading specified by the author. The differences between the model and the actual antenna are likely due to W2EEY's construction method.
9. Beta matching is described in detail in the 16th edition of The ARRL Antenna Book (Newington, 1992), pp. 26-21 to 26-23.
10. The ARRL Handbook (Newington, 1992), p. 2-18.