
 1. Getting Oriented
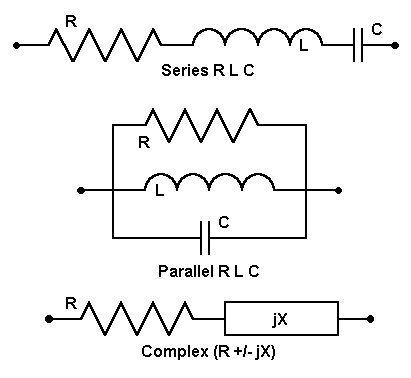
A load is simply a combination of resistance or reactance assigned to a segment. NEC is capable of assigning load as series R-L-C circuits (load type 0), parallel R-L-C circuits (load type 1), or as complex series R +/- jX impedance loads (load type 4). (NEC may also assign loads as series or parallel R-L-C values per unit of length (load types 2 and 3), but we shall not have occasion to deal with this option in this series.) Figure 1 surveys some of the options.
In this part of the series, we shall deal only with series R +/- jX impedance loads. They are among the simplest to implement and manipulate, although they do have some limitations. We shall also mention the load that many users do not think of as a load: wire conductivity (load type 5). (NEC-4 is also able to handle wire relative permeability.)
For many modelers, this first part is a review of the most basic sort. However, within the review there might be a detail or two that will make a more advanced procedure a little bit clearer.
Unless we wish to use lossless wire in our model, we ordinarily specify a material or materials for the antenna elements. With commercial implementations of NEC, this specification may occur as a special entry apart from program means of introducing other types of loads. Nevertheless, the specification results in LD entries of type 5. Here is a typical entry:
  LD  5    1     1       101     5.8001E7
     Type Tag 1st-Seg Last-Seg Conductivity
The entry spacing has been widened to permit labeling the parts. A Type 5 load is a round wire internal impedance specification. The Tag indicates the wire number, here the only wire of a simple dipole antenna. The first and last segment designators set the limits of application of the value. Finally, the conductivity figure is in siemans(mhos)/meter. The 1-wire antenna has 101 segments, all with the conductivity of copper.
Various implementations of NEC may handle the conductivity figure differently. Some provide named entries (for example, "copper"). Others provide conductivity figures or provisions for conductivity entry so that users can specify exact material properties. Still others provide custom entry in terms of resistance per unit of length, the inverse of conductivity. However entered, the entry is translated to an input of the type shown or its programmatic equivalent.
Unless an antenna uses materials of very specialized sorts, performance will not be altered to a significant degree by specifying either copper of aluminum (in its own various types). EZNEC permits only a single wire material specification, and users may use with confidence in the results either the conductivity of the "worst" material or the conductivity of the most dominant material in the antenna. However, NEC itself permit all manner of combinations of materials to be specified. NEC-Win Pro permits all the element load entries permitted by NEC itself, if modeling changes of material is an important consideration. With access to individual line entries, one may also within NEC-Win Pro load all segments or all wires to the same value in a single line by specifying the tag and the first and last segment entries as 0.
Entering spot loads differs according to the implementation of NEC. Since we shall restrict ourselves in this part of the series to complex impedances composed of resistance and reactance only, we shall speak only in terms of type 4 loads for the moment. A basic NEC entry cord for such a load might look like the following:
  LD  4    1     77       77       0         870.4
     Type Tag 1st-Seg Last-Seg Resistance Reactance
At wire (tag) 1, on segment number 77 (first and last segment), we introduced a load of type R +/- jX with a resistance of 0 ohms and an inductive reactance of 870.4 ohms. (R and jX are always entered in ohms.) Although a 0-ohm resistance is does not coincide with reality, introducing pure reactances as a step in the modeling process can be useful, as we shall see down the line.
Specifying spot loads within commercial implementations of NEC may take a number of forms. In EZNEC, there is a separate load screen, a sample of which is replicated in Figure 2.
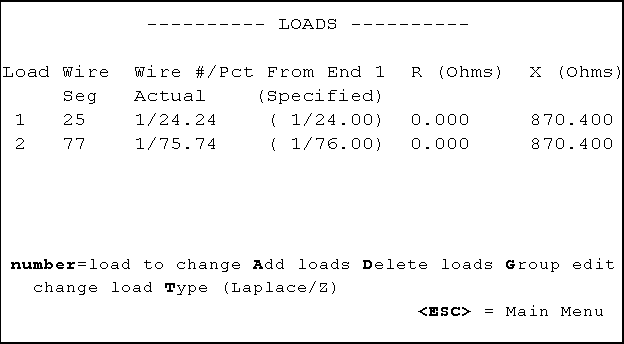
Making an entry consists of adding the desired number of loads and then specifying their positions and values. In EZNEC, the user specifies a position in terms of a percentage along the wire. The program places the load on the segment closest to the specified percentage and lists the segment number and the actual percentage along the wire. R and X entries are self-explanatory.
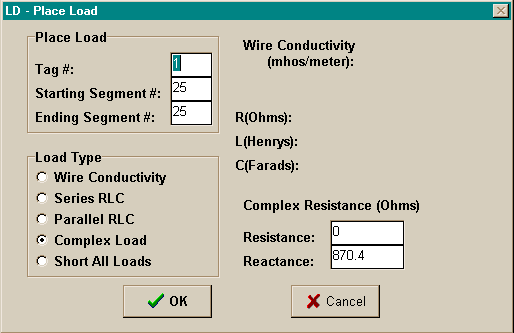
NEC-Win Pro permits three modes of load entry. One is to create a load line of the type shown by typing it into the antenna description. One may also access a "Place Load" box from the description and enter the requisite data, as shown in Figure 3 (which replicates load #1 in the EZNEC figure).
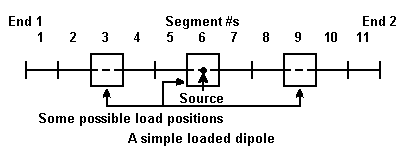
An alternative exists within the NEC-Win Basic module, which is provided for rapid entry of basic antenna information. The user may "drag and drop" loads (and sources) and then access a data box for numerical entries and load-type specification. Although the first two methods refer only to tags, this system also provides a percentage along the wire, which is useful for calculating the precise linear position of loads. Figure 4 shows an example.

Virtually all other implementations of load placement in commercial implementations of NEC will be a variant on these systems.
Like loads, sources are distributed along a segment, although it is often convenient to think of them as appearing in the center of a segment. Hence, for a single-wire element, we need an odd number of segments in order to truly center a single source. (We shall take up split sources in just a little bit.)
This 20-meter full-size dipole will be our reference point. Let us now cut the wire in half, for a length of 16.868' (2.571 m). We shall retain the 101 segments, since each segment turns out to be just about 2" long (about 5.1 cm). At 14.15 MHz, gain is 1.73 dBi, and the feedpoint impedance registers as 12.67 - j870.4 ohms.
Let us introduce a complex or R +/- jX load at the center of the antenna (the 50% mark or segment 51). Let it be a pure inductive reactance of 870.4 ohms (R=0; jX=870.4). Loads are considered by NEC to be in series with sources. Therefore, it should be no surprise that rerunning the model produces feed point impedance of 12.67 - j0.04 ohms. The effect is equivalent to introducing a perfect center loading inductor having the require reactance. If the inductor could be perfect, the gain of the antenna would not change: 1.73 dBi.
As an interesting exercise, let us replace the center load with two other loads spaced away from the center. In fact, let us place them at the points where equal inductive reactances of 870.4 ohms (with no resistance) also produce resonance. These positions happen to be at segments 25 and 77 of our 101 segment model, a little over 24% inward from the ends. In other words, the positions are just beyond the midpoints of each half of the dipole. Interestingly, the antenna gain is 1.76 dBi, an insignificant amount greater than with center loading. (Mid-element loading of dipoles and dipole-based antennas is done not for added gain, but for other antenna properties, some related to the feedpoint impedance on the prime and other frequencies, some related to mechanical considerations).
The feedpoint impedance climbs to 26.08 + j1.65 ohms. (This value is as close to resonance as one may come in the model without changing the value of the loads.) The higher feedpoint impedance is one of those good reasons for using mid-element loading in preference to center-loading.
As an initial exercise, try moving these mid-element loads, without changing the reactance, one segment closer to center and then one segment farther from center. Notice that a 2" change in placement per load results in over 60-ohms reactance at the feedpoint. You may also replicate this entire sequence using other element wire diameters. Expect to find a different resonant length for the basic reference antenna, as well as changes in the requisite loading to restore resonance using either a center or mid-element loading technique. The patterns will familiarize you with trends that may be useful in the design of more advanced antennas.
As a further exercise, the modeler may also wish to check all of the points along the antenna length between center loading and the point at which mid- element loads reach the value of the center load. One will discover a curve of ever-more rapidly increasing reactance values. In fact, if one continues the exercise beyond the point used in this exercise, there will come a point where adding reactance to achieve resonance is no longer effective in terms of practical inductors. Yet helical structures placed at the ends of short inductors can resonate the antenna. Are they not inductors, that is vehicles of inductive reactance?
In fact, although the structures exhibit inductive reactance, at the ends of antennas they function primarily as lengths of wire necessary to achieve the current distribution along the entire wire to produce a feedpoint impedance that is wholly resistive. Many non-helical structures, including so-called capacitive hats, may achieve similar results. The inductive reactance of end coils is largely incidental to most amateur designs. However, it may be used for other purposes, such as in a trap. (Models suggest that the trap is not an appendage to the antenna length that it terminates, but is indeed a part of that length.)
Our original dipole consisted of a single wire, divided into 101 segments. Let us replace that wire with two wires, each half the length of the original. We shall assign 50 segments to each and let them join in the middle. Unless we use a different feed system, the source will not be centered.
NEC is able to use a split source. If we specify either a split voltage or a split current source, we should place the source on the last (right-most) segment of the first wire--the segment joining the second wire. It pays to use any graphical antenna viewing system to ensure that the source is properly place. On some systems, the source will show up as two sources, one on the last segment of the first wire and the other on the first segment of the next wire.
NEC treats these two sources as being in series, and the total impedance is simply the sum of the individual impedances of the source. Normally, only the composite values is shown in the outputs of commercial implementations. For our reconfigured dipole (with no change in total length, the split feed system returns a gain of 1.73 dBi (identical to that of the center, single source model) and a feedpoint impedance of 12.93 - j879.4 ohms. The source impedance is within a percent or so of the earlier model.
Loading the antenna mid-element requires no change except for the precise value of the load assigned to each of the two med-element loads. Moreover, because the segmentation varies very slightly from the single-source model, moving the loads inward or outward by one segment may surround true resonance, rather than hitting it with precision. (Obviously, other models may reverse the effect.)
Loading at the antenna center, however, calls for a change in procedure. Instead of assigning a single load to a single segment, we create two loads, each half the total load. We assign these load to the segments containing the sources. Hence, the last segment of wire 1 (Seg 50) receives a load of R=0, X=j439.7, and the first segment of the next wire (Seg 1) receives an identical load. In our example, the source impedance returned a value of 12.93 + j0.04 ohms.
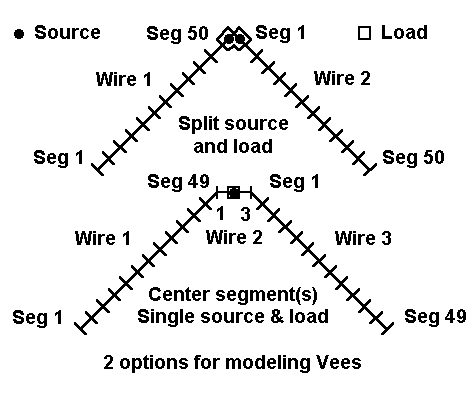
The figure shows a schematic representation of the principle of split sources and loads applied to an inverted Vee. For simplicity, I simply rotated the dipole elements downward (still in free space) by 45 degrees. This actually made the elements a bit shorter than half size. But since we are going to load the elements, the difference make no big difference.
Using a split source, the model returned an impedance of 6.84 - j900.9 ohms. Adding purely reactive loads of -j450.45 ohms to each segment containing a source produced a source impedance of 6.843 + j0.05 ohms, showing that the technique indeed works.
There is an alternative to using split sources and loads. At the junction of the wires where we desire to place either a source or a load (or both), we may do a little substitute modeling. At the center point of the antenna element, create a short wire that is horizontal. To this very short wire, connect the angled wires at their normal lengths or their lengths minus half the length of the new wire.
Recommendations concerning the minimum length of this wire vary. However, if the wire has the same diameter (or radius, in pure NEC terms) as the connecting wires and if the segments are about the same length as the segments in the joining wires, it will make little difference whether the new center wire has 1 or 3 segments or what its precise length is. Place a single source on the center segment of the new wire.
For the inverted Vee with 100 segments, I created first a 3 segment wire 6" long. This preserved the approximate 2" length of all segments. I made no direct changes in the angled-wire lengths, but simply connected them to the new wire. This did alter the overall length of the antenna very slightly. The source was placed at the center of this new wire (Wire 2, Seg 2). The source impedance returned a value of 6.72 - j855.6 ohms. A single purely inductive load of the same absolute value placed on the same segment (in series with the source) eliminated the reactance.
I also use a single 2" long horizontal segment as the center wire. This changed the antenna length slightly less than the 6" center wire. The source was placed on the only segment of this Wire (Wire 2). The source impedance returned was 6.687 - j875.7, which a suitable inductive load placed on the same segment also eliminated.
With angled wires, expect minor variations in the values returned between the split source/load technique and the center section technique. In these examples, the values are well within the range of adjustments one normally expects to make with real antennas on site. However, the models with the longer horizontal center sections consistently showed a slightly higher gain than the split source model, and this effect showed up over real ground as well. The effect results from a portion of the antenna at the high current region being immune from the partial cancelling of fields that results from the Vee configuration. Expect up to a 0.1 dB difference in gain, depending on the length of the center section.
These notes apply to heavily segmented models, such as the ones used in these examples. Ordinarily, NEC yields accurate results with linear elements with as few as 11 segments per half wavelength. Moreover, the fewer the segments, the faster the run-time for a model. However, where geometries grow complex even to the slightest degree--as in the case of the Vee--attention to segment length is advisable for the most accurate results. For a given configuration, the modeler should always achieve convergence to the degree required by the practical application. Convergence is simply raising the number of segments per wire (usually as a percentage) until further increases yield output figures that do not significantly vary from those produced by the next lower number of segments. These exercises, of course, are unduly segment and precision laden in order to familiarize you with the numbers and movements of numbers you may expect from the program.
Knowing or being able to estimate the Q of a loading capacitive or inductive reactance allows us to calculate the resistance needed to complete a realistic load. Most commercial inductors I have encountered have had a Q between 150 and 300. As an exercise, let's go back to the shortened dipole with 101 segments and see what these particular Qs do to antenna performance. The following input line shows a typical entry:
  LD  4    1     77       77       2.9       870.4
     Type Tag 1st-Seg Last-Seg Resistance Reactance
With a center load of j870.4 and infinite Q (or zero resistance), the antenna gain was 1.73 dBi, with a source impedance of 12.67 - j0.04 ohms. If we let Q=300, then the resistance in series with the reactance is about 2.9 ohms. Under these conditions, the antenna model returns a gain of 0.83 dBi and a source impedance of 15.57 - j0.04 ohms. The source impedance is clearly the sum of the load loss resistance and the source impedance without a loss. If we let Q=150, the load resistance is 5.8 ohms, returning a gain value of 0.09 and a source impedance of 18.47 - j0.02.
Using the model with two mid-element loads of the same value as the center load and positioned to provide resonance, we come up with comparable figures. With no resistance, the model showed a gain of 1.76 dBi and a source impedance of 26.08 + j1.65 ohms. With a Q of 300, each load has a series resistance of 2.9 ohms. This model shows a gain of 0.93 dBi and a source impedance of 31.55 + j1.52 ohms. Lowering the Q to 150 requires a series resistance of 5.8 ohms, with a consequential gain of 0.24 dBi and a source impedance of 37.01 + j1.37 ohms.
Notice that resistive component of the source impedance is close to but not quite the sum of the load resistors and the source resistance of the unloaded antenna. This difference exists because the current magnitude at the load is not the source current, but a slightly less value of about 97% source current. The loads, of course, are positioned only a little over 1/16 of a wavelength away from the source.
NEC also returns data on the loads, which is accessible in the outputs of most implementations. Among the direct or calculable data is the power consumed in the loads. With a Q of 300, the center-loaded model consumes nearly 19% of the power in the load, while the mid-element loaded model consumes about 17% of the power between the two loading inductors. Hence, there is about a 0.1 dB difference in the gain of the two models.
At a Q of 150, the center-loaded model consumes over 37% of the power in the load, while the mid-element loads together consume a little under 30% of the power. Hence, there is a greater (0.15) difference in the gain levels of the two models. If mid-element loading begins to show a distinct advantage over center loading (apart from source impedance and mechanical considerations), it is with low Q loads.
As with models using pure reactances, the numbers yielded by your specific implementation of NEC may vary slightly from these. However, you should notice the same trends. As an exercise, you may wish to run load Qs ranging from 100 to 1000 for various load positions and values in order to familiarize yourself with the trends involved. Be sure to make use of all relevant outputs from NEC, including load data and current distribution along the antenna.
Consider a 20-meter dipole of #14 copper wire, which for free space resonance was 33.7' long. The source impedance was just about 73 ohms. Suppose, as an exercise, we make the antenna 36' long. The source impedance now registers as 90.9 + j102.8 ohms: highly nonresonant.
However, using the same techniques as shown earlier, let us insert in the model a load in the same segment as the source. The load will be R=0, jX=- 102.8 ohms.
  LD  4    1     51       51       0        -102.8
     Type Tag 1st-Seg Last-Seg Resistance Reactance
Now the model will show a source impedance of 90 - j0.05 ohms. The lengthening of the element increased the gain by 0.06 dB, but we ignore that small amount.
Although we may divide an inductor into two parts, we must use separate capacitors to place equal amounts of capacitive reactance on each side of the source. Let's revise the load to place a reactance of -j51.4 ohms on each side of the load, by using the segments just before and after the source segment.
  LD  4    1     50       50       0         870.4
  LD  4    1     52       52       0         870.4
     Type Tag 1st-Seg Last-Seg Resistance Reactance
Now the source impedance is 89.25 - j0.32 ohms.
Although the movement of the loading was small, the trend is evident. Just as placing inductive reactance farther outward on an element moved the source impedance closer to that of a standard dipole (relative to center loading), so too, placing a capacitive reactance farther outward on an element will also move the impedance closer to that of a standard dipole (again, relative to center loading). You can continue to move the capacitive reactance load outward to familiarize yourself with the trends in effects.
Here, the exercise is largely academic. However, the scheme of lengthening a driven element to raise the resistive component of its source impedance and then using capacitive loading to compensate for the resulting inductive reactance at the source has been used by at least one Yagi manufacturer in the past. The case involved a Yagi, whose driven element showed an impedance below 50 ohms. Lengthening and loading it provided the desired source impedance to match a 50-ohm coaxial cable feedline system.
Other applications of intentional capacitive loading include the controlled current distribution antenna, described by WB9RQR and W9WQ in the ARRL Antenna Compendium, Vol. 2 (pp. 132-135). A less load-laden antenna using capacitive loading to control antenna characteristics is the modified extended double Zepp (also called the double extended Zepp) described by N6LF in the ARRL Antenna Compendium, Vol. 4 (pp. 78-80).
Most capacitors whose ratings are not exceeded by an antenna application
have Qs well in excess of 1000. Consequently, it is much safer to model
capacitive loads without adding in a series R value than it is inductive
loads. However, in some instances, capacitor leakage cannot be ignored.
In such cases, estimates of Q will result in series resistance values
calculated just as for inductive reactances. However, in most cases, the
values will be much smaller, since the Qs will still be quite high.
In order to more accurately model the behavior of loads, we shall have to
learn how to place series and parallel combinations of resistors,
capacitors, and inductors as loads. In the process, we shall not only be
able to model inductors and capacitors individually, but as well we shall
be able to model traps and other tuned circuits placed within antennas.
However, all that is for another segment of this series.
Updated 12-18-97. © L. B. Cebik, W4RNL. Data may be used for
personal purposes, but may not be reproduced for publication in print or
any other medium without permission of the author.