MODELING AND UNDERSTANDING SMALL BEAMS
PART 8: CAPACITY HATS AND YAGIS
For horizontal antennas, capacity hats seem to have gone out of style. However, we may be overlooking a useful means of shortening Yagi antennas by neglecting what some call "capacity loading." In fact, by using hats, we can construct a quite useful 2-element Yagi and gain something over inductive loading.
The elements for the proposed Yagi were just under 75% of full size, so I calculated the anticipated hat size using the usual means for antennas down to about 2/3rds normal length. The results were far off the dimensions modeled on NEC-2. The shortened capacity-hat 2-element Yagi for 10-meters built as a test prototype answered closely to the NEC results. The success of the antenna suggested that the traditional methods for calculating hats might need some revision to calibrate them to NEC models. Both the calibration and the antenna are worth noting, if for no other reason than to restore capacity hats to the repertoire of techniques for building shortened Yagi beams.
A hat is a "loading" assembly attached to the end(s) of an antenna element. It has two very significant properties. First, it is used to bring a shortened antenna to resonance or some other specific set of characteristics. An example of the use of a hat for other than feedpoint resonance is the shortening of a parasitic element in a Yagi. Second, the hat does not contribute to the radiation of the overall antenna element.
In these two characteristics, the hat performs like a lumped constant load inserted at the feedpoint (center-loading for a dipole, base-loading for a vertical) or along the antenna element (mid-loading for a dipole, center-loading for a vertical). For a given antenna length down to about 60 degrees (for a vertical or for each side of a dipole), a hat generally provides greater efficiency than other forms of loading.
A hat performs its function as a significant physical structure rather than as a lumped component. To programs like NEC and MININEC, an antenna is just a physical structure along which currents flow. Inductive and capacitive loads are treated as lumped constants. Hats, however, are parts of the structure and modeled as such. Models may thus provide some insight into hat operation.
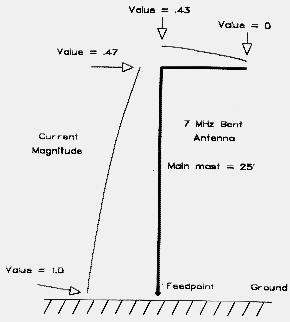
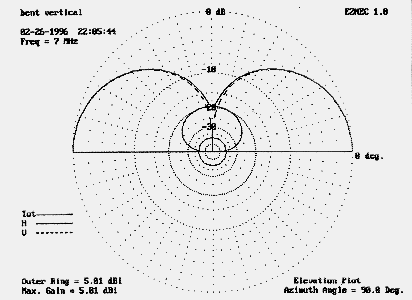
Related to the hat is the bent antenna, one with the element beginning in one direction and, at a certain point, taking off in a direction 90 different. The bent vertical over perfect ground, modeled in Figure 1, illustrates the current flow along the antenna. Notice that the current in the bent portion contributes significantly to the overall antenna pattern, as illustrated in the far field pattern modeled in Figure 2.
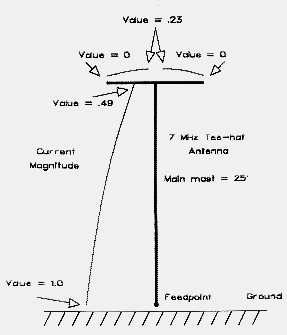
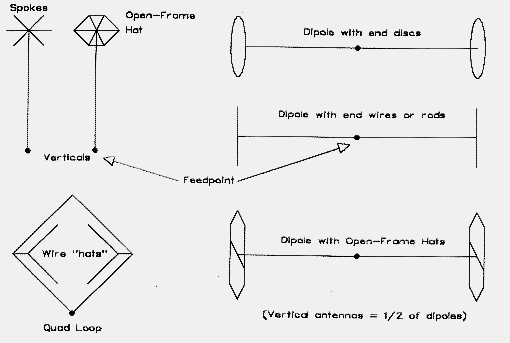
By way of contrast, a hat is a symmetrical structure. Although Figure 3 shows a Tee configuration, any number of symmetrical structures achieve the same goal. Among the more common forms are spokes, circular disks, and other open-frame structures with perimeters, including squares, hexagons, and octagons. Even triangles or simple opposed wires will work well, so long as symmetry is maintained. Figure 4 shows a few examples of hat structures.
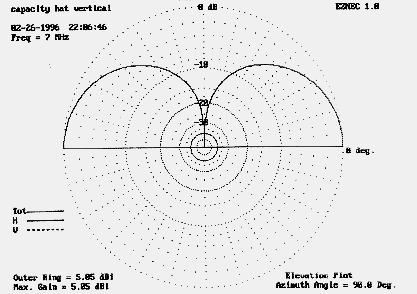
At corresponding points outward from the element end to which the hat is attached, currents are equal but flowing in opposite directions. The result is (if perfect) no resultant field or (within construction limits) a negligible field. Figure 5 models the far field for an antenna of the same vertical dimension as the antenna in Figure 2, but with a hat instead of a bent top. There is no horizontal far field component to the antenna's radiation pattern.
The antenna's current distributes itself at the hub of the hat and flows equally, but at decreasing values, along the hat spokes. If the structure has a perimeter wire, the current then proceeds from the spoke tip in two directions, reaching minimum value at the mid-perimeter points of the framework. Assuming a vertical antenna portion of fixed length, the current level at the hat hub will be somewhat higher than the current level at the bend of an antenna like that if Figure 1. The lower level for the bent vertical is occasioned by the interaction of fields at and near the bend point.
Well-modeled antennas with hats provide a close correlation to constructed antennas. The models I have used generally provide enough wire segments in the main element so that each segment length is similar to the segment lengths in the hat. The results have been as accurate as my modest shop equipment will allow me to reproduce.
However, hat models tend to drive both NEC-2 and MININEC toward their limits of accuracy, but in different ways. Some hat models in NEC can easily exceed recommended limits for multi-wire junctions and for minimum angles between adjoining wires. If the hat material is of a different diameter than the main antenna element, NEC-2 can respond to some combinations with scarcely credible values for gain and source impedance. Although MININEC handles such junctions as a matter of course, it is sensitive to the acute angles between hat spokes. Moreover, complex hat structures can quickly exceed the allowable number of segments permitted by the program. Both programs are sensitive to other limitations as well. Nonetheless, models of closed hats structures (with spokes and a perimeter wire) showed a close correlation between programs, while the deviation between the programs with hats composed of spokes alone was usually within 2% or so. I suspect that the antenna current cancellation within the hat assemblies has much to do with the better than anticipated modeling results.
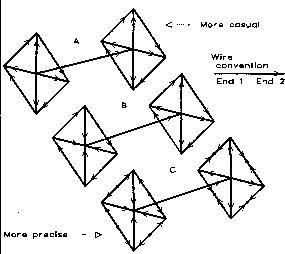
Modeling capacity hats also requires careful attention to detail, depending upon the data one seeks from the model. As Figure 6 suggests in part A, the most casual technique in modeling would be to create a dipole and then add outward pointing spokes at each end. Finally, connect the spoke tips with a perimeter wire. Although this model will return correct values for gain and feedpoint impedance, the currents along the spokes will be incorrect with respect to phase at the left (or starting) end of the model. For example, in one 10-meter model, the current phase along the spoke is approximately -4.6� instead of the figure of 175.3� that the casual model returns.
Reversing the spokes at the initial end to model them from point to hub (main element) will correct this error, as shown in part B. However, using single wires to connect the spokes will return an erroneous phase reversal at the midpoints of the wires on both ends. Current is least at the midpoints of the perimeter wires: this is the point at which the model should begin on one end and end on the other. For most accurate modeling of antenna current, each perimeter segment should be split in the middle into two wires, as shown in part C. On the initial end, begin from the midpoint and extend the wire to the spoke point. On the finishing end, model the last wires from the spoke points to the perimeter midpoints.
If you only require a little data from your model of a capacity-hat vertical, dipole, or Yagi, quicker casual models will do. However, if you wish to derive the maximum understanding of antenna performance and properties, model with great care. Even with the greatest care in model construction, there remain limits to what method-of-moment models can calculate, especially within the boundaries of nonengineering versions of the programs. For further notes on the placement of hats at other than atnenna element ends, see Where Do I Hang My Hat? at this site.
So far, we have a shortened antenna with a symmetrical physical end structure called a hat. However, looking at the antenna this way alone does not yet justify calling the assembly a capacity hat.
According to the classical transmission-line analogy for antennas, we may view an antenna as a single open-wire transmission line. The usual sorts of antennas investigated from this perspective are either equal to or shorter than quarter-wavelength verticals or half wavelength dipoles. If not resonant, these antennas will exhibit capacitive reactance. Hence, lumped component inductive loads may be used to increase their electrical length.
Alternatively, one may calculate the amount by which an antenna is shorter than resonant in electrical degrees. If we know the characteristic impedance of the antenna-transmission line, we can use this figure in the same way we do for parallel line capacitive stubs to calculate the necessary size of a corresponding single-wire "stub" for the end of the antenna.
A stub for a single wire transmission line will have a different construction from parallel line stubs. It will appear as a symmetrical surface or framework of a size providing the necessary capacitive reactance called for by the calculation of the missing antenna segment. This is the capacity hat.
Thinking of the hat as a capacitor "plate" can lead to many misleading conceptions about hats. Although real-world antennas capacitively couple to many conductive objects and surfaces, the capacity of a capacity hat is not a function of coupling to anything. For example, the capacitance between capacity hat "plates" for a free space dipole at 3 MHz and 2/3rds resonant length is under 0.05 pF. Hat "capacity" is a function of the capacitive reactance necessary to bring a shortened antenna to resonance (or some other specification) under the transmission-line analogy calculation. The value of calculating it is to convert the electrical property of reactance into a physical property: area. The standard model surface for a hat has long been the circular disk with no thickness in isolated free space. Standard references correlate its diameter to a certain capacitance.
where C is the capacitance in pF and d is the diameter of the disk in inches.1
The capacitance of open-frame capacity hats made up of spokes and (optionally) a perimeter wire is not the same as that of a flat disk. Open-frame capacity hats have a finite thickness. Moreover, the capacity of the hat will vary with the number of spokes in a complex manner. Therefore, the simple correlation between disk diameter and capacitance will not work for these types of hats.
As an exercise, I constructed models of hats at 3 MHz for a 60 long, 1"-diameter antenna using increasing numbers of spokes for both spoke-only and perimeter-wire configurations. The hats in the models used #28 wire to approach a condition where the thickness was insignificant relative to the surface area. The exercise ceased at 32 spokes, which approaches or exceeds the NEC-2 recommended number of wire junctions at any given point on an antenna. The data points included 3, 4, 6, 8, 12, 16, 24, and 32 spokes, which were then resolved into curves fitting the following equations:

where LT is the spoke length, LS is the shortest spoke length (at 32 spokes), LL is the longest spoke length (at 3 spokes), NH is the highest number of spokes considered (32), and NX is the number of spokes presently in question. The exponent, EE, is given by

where NL is the lowest number of spokes considered (3). This simple curve-fitting exercise made it possible to generate graphs on a linear baseline, as shown in Figure 7.
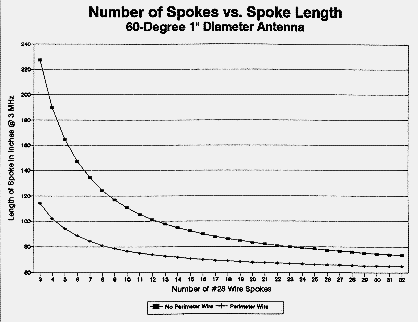
The significance of the curves is that they indicate a convergence in the vicinity of about 60 inches. This value would approximate a solid disk, since adding further spokes would not significantly further reduce the length of each spoke. A disk with a diameter of 120 inches would have a capacitance of approximately 108 pF. This value is from 30% to 60% distant from values generated by any of the transmission-line analogy equations. Nonetheless, one can correlate open-frame hats to antenna element loading requirements and to modeled hats in a rough but systematic manner. See the Appendix for further notes on calibrating transmission-analogy calculations to NEC-modeled hats.
Whatever the correlation between capacity hats and loading requirements, it will work equally well for a vertical over perfect ground and for each end of a dipole in free space with no ground reference of any sort. The same holds true of open-frame hat structures. In short, the hat should be thought of in the same way we think of parallel transmission-line capacitive stubs: both provide requisite amounts of reactance where needed. Like stubs, capacitive hats are thrown off their prescribed task by being too closely coupled to external objects.
For some further studies of capacity-hat verticals--along with variations on strict "hat" top loading--see Half-Length 80-Meter Vertical Monopoles: the Best Method of Loading Parts 1-5.
Modeling a capacity hat is a matter of trial and error without some guiding approximation of the proper hat size. However, without extensive modification, classical VLF calculations of hat size provides confusing guidance, if any at all. See the Appendix for further notes on this subject. Here we shall briefly look at the traditional transmission-line analogy.
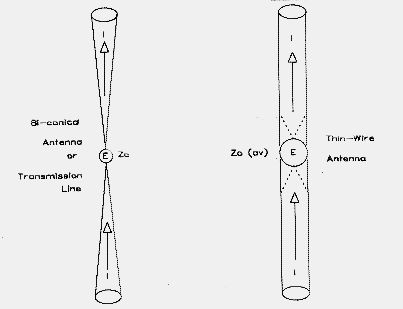
Figure 8 shows the essential elements of two antennas: a conical dipole and a wire dipole. For the conical dipole or bi-conical transmission line, the ratio of voltage to current will be everywhere the same along the length of the dipole (ignoring the ends). Hence, the antenna-transmission line has a constant or characteristic impedance, ZO. Thin wire antennas only approximate this condition: the impedance varies along the wire and is greatest at the ends. However, it is useful to derive the average impedance of the antenna and to use that figure as if it were the characteristic impedance.
As Belrose has noted in his review of resolutions to the integrals that describe the average characteristic impedance (Zo) of antennas, there are at least four different formulations: Shelkunoff, Laport, Howe, and Labus (as modified by Jordan and Balmain). All were developed for low frequency applications.2 The methods all give different values for Zo and consequently for the requisite loading capacitive reactance and its associated capacitance at the frequency of interest. Figure 9 demonstrates the differences at 30 MHz, using capacitive reactance as the comparative figure for a 30 compensating hat. None closely approaches the reference curve of reactances derived from NEC models of 30-long antennas, which most closely approximate the values of capacitance indicated by exercises illustrated earlier in Figure 7.
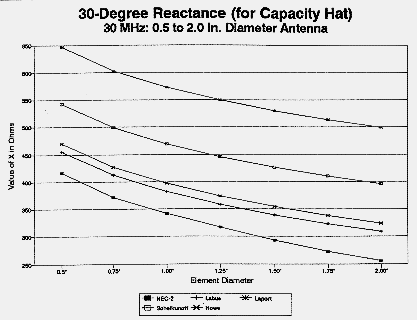
Belrose adopts Howe's equation as yielding results for feedpoint impedances that agree most closely with measured results. For purposes explained in the Appendix, I shall note the Shelkunoff equation to illustrate the calculation technique. This is also the version used by Schulz and which appears in ARRL publications.3 For dipole antennas less than a half wavelength long,

where Z0(av) is the "average" characteristic impedance of the antenna, h is the overall height or length of the antenna element, and a is its radius (with h and a in the same units and where h is much greater than a). For a vertical antenna, a quarter wavelength or less in height, the multiplier is halved:

For clarity, the following discussion will be limited to shortened vertical antennas at least 60 electrical degrees long, that is, at least two-thirds full size. To apply the discussion to dipoles in free space, think of the dipole as two verticals base-to-base.
Neither equation 5 nor any of the other versions notes above provides a basis for correlating open-frame capacity hats to antenna element lengths of varying diameter throughout the HF frequency range (3 to 30 MHz). Since the antenna diameter is a significant percentage of antenna length at HF, and a varying one as the frequency increases, one must introduce a corrective based upon the ratio of diameter (or radius) to length. The diameter corrective will yield consistent results as the main element is varied in diameter at any given frequency, but the correlation varies as the frequency is raised. Hence, an additional frequency corrective is needed.
The remainder of the required calculation is provided by most recent editions of The ARRL Antenna Book. The difference (in electrical degrees) between the shortened antenna and the full-size antenna represents the number of degrees of capacitive reactance to be supplied by the capacity hat. The required capacitive loading can be found in two simple equations:

where ZO is the average characteristic impedance just calculated, XC is the required capacitive loading reactance in ohms, and is the required loading length in electrical degrees, that is, the missing part of a quarter wavelength. From the capacitive reactance, we move to the required capacitance

where f is the frequency in MHz and C is the capacitance in pF. Ostensibly, we need only move to equation 1 to convert this value into the diameter of a capacity hat. However, we have already seen that complex open-frame hat structures do not answer readily to this simple maneuver.
To construct a capacity hat dipole, simply construct two vertical antennas, base-to-base, and feed at the base junction. The capacity hat sizes for any given frequency and choice of materials will be virtually identical to those calculated for a vertical. Expect the feedpoint impedance of a 120� dipole to be about double that of a corresponding 60� vertical: about 59 Ohms compared to 28 Ohms.
Horizontal capacity-hat dipoles do not suffer the same type of ground loss as ground-mounted verticals. Assuming similar structural losses as a vertical due to the choice of antenna and hat materials, as well as construction methods, a capacity-hat dipole is subject to standard ground reflection losses that depend upon ground quality. Capacity-hat dipoles do not radically change their feedpoint impedance when modeled over ground, which makes them reasonably close matches for 50- coax feedlines. Moreover, they do not suffer nearly the degree of narrowed SWR bandwidth experienced with center-loaded dipoles.
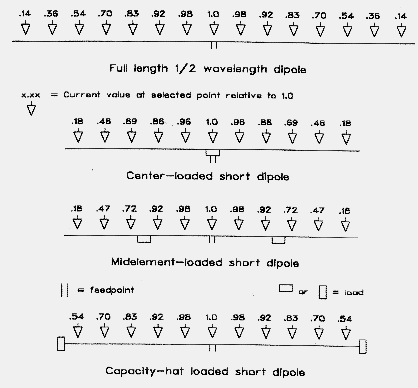
The comparative gains of 120� dipoles (twice the length of a 60� vertical) when center loaded with a 300-Q inductor (a generous value out of doors) and when capacity-hat loaded are approximately 1.85 dBi and 2.05 dBi, respectively. Figure 10 demonstrates the reason for the difference: the capacity hat dipole maintains close to the same current levels--increment for increment--as a full-size dipole, whereas the center-loaded dipole shows lower current levels everywhere along the element. The gain differential for a dipole is small, perhaps small enough to be ignored in operation. However, when such dipoles are placed in a 2-element Yagi configuration, they suffice to alter performance more significantly.
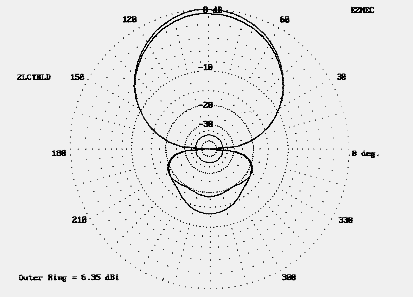
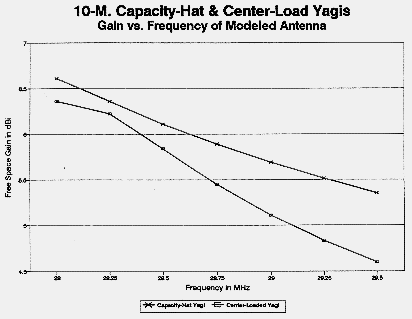
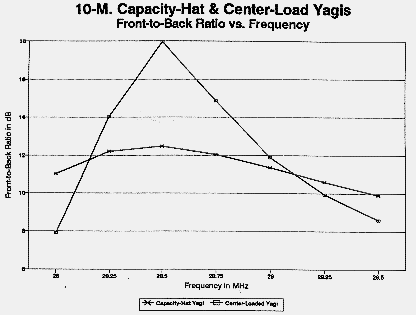
The center-loaded Yagi can attain a higher front-to-back ratio, which can be tailored to some degree by changing the reflector inductor Q. However, the increase comes at the expense of forward gain. The capacity-hat Yagi exhibits higher gain that approaches the value for a full-size Yagi of the same spacing. At the same time, its front-to-back ratio is limited essentially to the levels achieved by a full-size 2-element Yagi. Figure 11 provides comparative free-space azimuth patterns for the two types of Yagis using identical element lengths, diameters, and spacings. Figure 12 shows in graphical form the gain across the 10-meter band of center-loaded and capacity-hat-loaded Yagis with elements of identical length, diameter, and spacing. Figure 13 shows the front-to-back ratio across the band for the same antennas.
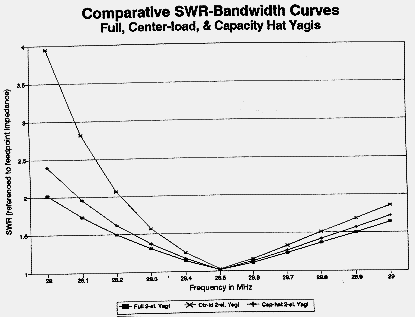
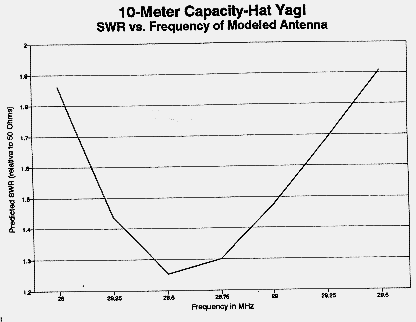
The weight one gives to the relative advantages of center-loaded and capacity-hat Yagis depends upon the requirements of the application. For general amateur work, the greatest advantage of the capacity-hat Yagi may lie in its broader SWR-bandwidth curve. Figure 14 compares 10-meter 2-element Yagis of comparable spacing. The capacity-hat model more closely approximates the performance of a full-size antenna than does the center-loaded model (set for a load Q of 300). Moreover, the capacity hat Yagi also maintains its other characteristics--gain and front-to-back ratio--over a wider bandwidth. The capacity-hat Yagi is at least a candidate for a small mono-band Yagi--if one can build it.
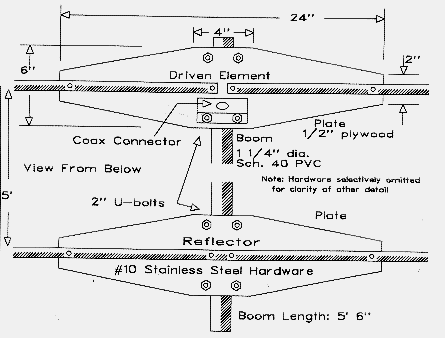
The test antenna was a 10-meter 2-element Yagi with the following dimensions: driven element: 11' 7"; reflector: 12'2"; spacing 4'3"; elements: 0.75" diameter hardware store aluminum (0.05" wall thickness). These dimensions are the same as those for the linear-loaded antenna used as a test model. In fact, the capacity-hat antenna was created by removing the linear loads and adding capacity hats to the element ends. Figure 15 reviews the general construction methods used for the PVC boom and half-inch plywood element plates.
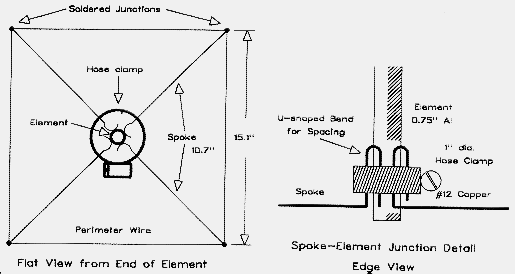
Since the linear loads (or corresponding inductive loads) were of equal value for the driven element and for the reflector, I anticipated needing capacity hats of equal size for these elements. Models indicated that a #12 square hat with a perimeter wire would require spoke between 10.6" and 10.8" long for both elements. I constructed four "identical" hats from #12 house wire with the insulation removed. Using a scrap of plywood about 2' square, I drilled a 3/4" hole in the center and laid out the spoke and perimeter wire runs in pencil. I placed a short scrap of 3/4" diameter aluminum tubing in the hole. The spoke wires were cut long with a 1.5" "U" at one end, bent 90 to the spoke. The four spoke Us were placed against the aluminum tube and clamped with a stainless steel hose clamp. The Us spaced the spokes evenly around the outside of the tube. The excess of the U at the curved end was bent outward slightly to prevent the clamp from falling off when loosened. The spokes were temporarily stapled to the base-board along their inscribed paths. Each was about a half inch longer than the correct spoke length.
The assembly of the hat was a task for a heavy (100 watt) soldering iron or gun. Starting at one corner, I bent the spoke end around the perimeter wire and soldered the junction. Bending the perimeter wire 90, I proceeded to the next corner and repeated the process, finally ending back where I began. Figure 16 shows the outlines of the hat on the jig. After construction, each hat was removed from the jig tube by loosening the hose clamp and moved to its element. since copper met aluminum at the junction, both metals were coated with contact "butter" during assembly. For long-term outdoor installation, the junction should be sealed as much as possible to slow weathering and other bi-metal problems.
Models indicated that the individual elements of the Yagi, if fed as dipoles, should resonate at 28.25 MHz for the driven element and 27.3 MHz for the reflector. I pretuned each element by resonating it independently. The maximum hat placement adjustment required was about a quarter inch down the element length, a move likely created by either the inexactness of my simple shop technique or by the flaring structure at the hat-element junction--or by both. The models proved quite accurate, and each dipole resonated with a feedpoint impedance close to 60 Ohms.
Combining elements into a Yagi required two steps beyond mounting the dipoles on the boom. First, the reflector-element feedpoint space was closed with a half-section of tubing across the former feedpoint opening. Second, the driven element feedpoint reactance was compensated by two 300 pF series capacitors, one from each side of the element center. This compensation provided a modeled SWR under 2:1 from 28 to 29.5 MHz without compromising antenna performance.
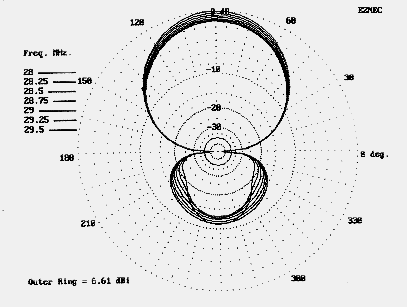
Figure 17 shows the modeled antenna performance across the 10-meter band. Although the figure does not permit one to sort the lines, the overall consistency of performance in terms of gain and front-to-back ratio is clear. Figure 18 shows the modeled SWR across the band. Although both figures are for models in free space, at 20 feet above medium ground, the antenna showed no significant variations.
Pretuning the elements individually resulted in a Yagi requiring no further adjustments after final assembly. Band-edge SWR figures were slightly higher than those modeled, rising to about 2.2:1. Local point-to-point test confirmed performance similar to my full-size 2-element Yagi, allowing for a 15' height differential. Several months of use has also confirmed the ability of the simple hats to slip the wind and remain well-positioned, since no change of performance of SWR have been noted. However, the dissimilar metal junction should be inspected and renewed at least yearly.
Like its linear-loaded predecessor, the capacity-hat Yagi can be partially disassembled for transport to portable operating sites. A six-foot long truck bed or van handles the 10-meter antenna with ease.
This exercise began with a simple question: are capacity hats an apt candidate for short 2-element Yagis. The initial model for the 10-meter beam was discovered by a trial-and-error process after handbook calculation procedures missed the mark by a good bit. That failure led to a more detailed investigation of the applicability of classical transmission-line analogy calculation procedures to HF antennas.
The capacity hat is a very reasonable way to obtain most closely full-size performance from a shortened-element Yagi. Although the hat structure is somewhat more ungainly than a feedpoint linear or inductive load, the capacity-hat Yagi exhibits a broader bandwidth for the essential performance properties of gain, front-to-back ratio, and feedpoint impedance. If these factors are important to a particular operational set-up, then building a capacity-hat Yagi is worth serious consideration.
The other artifact of the exercise, the simple GW Basic program attached to this article, in conjunction with one of the MININEC or NEC-2 modeling programs, may get you started.4
1. F. E. Terman, Radio Engineers' Handbook (New York: McGraw-Hill, 1943), p. 113.
2. See John S. Belrose, "VLF, LF, and MF Antennas," in Rudge, et al., Ed., The Handbook of Antenna Design, Volume 2 (London: Peregrinus, 1983), pp. 562-565, 598-599. See also E. C. Jordan and K. G. Balmain, Electromagnetic Waves and Radiating Systems, 2nd Ed. (Englewood Cliffs: Prentice-Hall, 1968), pp. 390-96, for a treatment of the work of Siegel and Labus. Also recommended is E. A. Laport, Radio Antenna Engineering (New York: McGraw-Hill, 1952), Chapter 1 ("Low Frequency Antennas"). Laport notes that even at these low frequencies, we must be "contented" with approximations (p. 28). Finally, see S. A. Schelkunoff, Electromagnetic Waves (New York: Van Nostrand, 1943), p. 290, as well as Jordan and Balmain, pp. 384-88.
3. Walter Schulz, K3OQF, "Designing a Vertical Antenna," QST (September, 1978), 19-21. Schulz's graphs have been replaced by equations in recent editions of The ARRL Antenna Book, 17th Ed. (Newington: ARRL, 1994), p. 2-40.
4. All NEC-2 models were done on EZNEC 1.06, available from Roy Lewallen, W7EL.
The classic process of calculating the required size of a capacity hat to load a shortened vertical antenna to resonance presents a model of apparent simplicity in 4 steps. Using the height and radius of the main antenna element, one calculates the average characteristic impedance, treating the antenna as a one-wire transmission line. From the characteristic impedance and the "missing" length of antenna relative to a resonant quarter wavelength antenna, one calculates the required capacitive reactance to achieve resonance. That reactance, in turn, converts to a capacitance for the frequency in question. Finally, using a solid disk without thickness as a model, one calculates the diameter of final capacitive hat.
Unfortunately, for amateur antennas in the HF range, the calculations and the theory underlying them are fraught with problems at every step. However, it seemed possible to at least correlate this independent means of calculating capacity hat size to modeled antenna-hat combinations in the HF frequency range. The attempt is summarized in the accompanying BASIC program. The goal was not to add anything significant to the fundamental theory underlying the transmission-line analogy on which the calculation scheme is based. Briefly looking at a number of the hurdles encountered along the way may be useful in the understanding of the application of that method to HF antennas in the 60 length range, whether verticals over perfect ground or dipoles in free space.
For the project at hand--correlating hat calculations to NEC-2 and MININEC models--the exact values of average characteristic impedance, reactance, and capacitance are unimportant except in the most derivative sense, because the feedpoint reactance can be determined by modeling. What the calculations required were values of Zo, Xc, and C amenable to simple correlation to the spoke lengths of various configurations of open-frame capacity hats. The Shelkunoff equation proved to be best suited to serve as the basis of these correlations. The final form of the modified Schelkunoff equation for the calculation of Zo for the HF range became

where h is the antenna height, M is the inverse of K (the antenna end effect shortening factor), d is the main element diameter, F is the frequency of interest in MHz (and 30 is the highest frequency of interest in MHz), and N is a calculation constant. Since the correctives are only approximate, the selection of N will bias the equation for certain types of capacity hats in preference to others. Using N = 0.583 biases the equation toward square spoke-plus-perimeter-wire closed hats of small hat-wire diameters. The result will be errors up to 5% for some types of hats.
There are two separate modifications of the basic Schelkunoff equation to account for varying antenna element diameters and for variations of frequency in the HF range. First, of all the various techniques tried, placing the antenna shortening factor (K, or M in equation 1) into the fundamental formulation for antenna height yielded the most correct curve for the effect of antenna element diameter on the spread of open-frame capacity hats considered. The same goal might have been achieved using an external correction equation, but it would have added considerable complexity to the calculation.
The first step in the process finding a usable figure for K is to derive from NEC models an adequate approximation. Resonating models of full-length quarter-wave verticals at the highest and lowest frequencies of interest--here 3 MHz and 30 MHz--over perfect ground allows calculation of intermediate values for K. (Throughout, resonance of a model is defined as a feedpoint reactance of less than �0.01 Ohm.) One very good approximation is

where K is the antenna shortening factor, Khf is the K of a resonant quarter-wavelength antenna of a given diameter at its highest frequency, Klf is the K of a resonant quarter-wavelength antenna of a given diameter at its lowest frequency, FH is the highest frequency (for Khf), and F is any frequency in the range of interest. The exponent, KV, also varies with frequency,

for the frequency range 3 to 30 MHz.1 The resulting values are those implicit in NEC-2 models and therefore most apt to the goal of correlating independent calculations to modeled structures.
The frequency correction factor was applied to the logarithm adjustment factor in equation 1 by decreasing the reduction in the logarithm of height vs. radius from the standard value of 1. Again, this correction could have been introduced externally to the basic calculation of Zo, but would have required a more complex formulation, the form of which would have resembled that of the calculation of K, but with a different progression of the exponent. Even the given form of the adjustment is an oversimplification, since letting N = 0.583 is accurate within 1% only for small diameter square hats with a perimeter wire of the same diameter as the spokes. Focusing on other parts of the matrix of hat configurations considered could vary the value of N by as much as 10%.
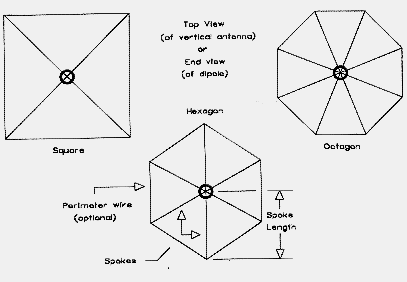
The value of C, the requisite capacitance that translates into a set of physical dimensions for a capacitive hat, is somewhat arbitrary, even if useful in this exercise. The capacitance value given in the accompanying program is for calculational reference only and not to be construed as a reliable figure. The calculation of a value of C required for a hat provides a convenient number which, when multiplied by a constant for a common hat configuration, results in an approximation of the spoke length required for the hat. Low order hats commonly consist of 4, 6, or 8 open-ended spokes. Alternatively they may consist of 4, 6, or 8 spokes connected by a perimeter wire. Both modeling and calculations here assume the perimeter wire is the same diameter as the spokes. This assumption may not be true in reality and result in further deviations from calculated sizes. Squares, hexagons, and octagons are perhaps the most common hat geometries hams will use at HF, and Figure 19 illustrates the three. The key dimension is the spoke length, from which everything else can be hand calculated or laid out on the shop bench. Hams use a variety of element sizes ranging ordinarily from 0.5" to 2" in diameters. Hat material is likely to range from #12 wire (0.0808" in diameter) up to about 1" tubing.
Determining the final constant of correlation between the previously calculated value of capacitance and the spoke length for the various configurations requires modeled hats at the four corners of the matrix: 3 MHz and 0.5" antenna element, 3 MHz and 2.0" element, 30 MHz and 0.5" element, and 30 MHz and 2.0" element. For any size spoke material, the modeled length is divided by the capacitance to produce a constant. The four constants are averaged. The process is repeated for each hat configuration and for each size of spoke material.
With the selection of the value of N given above, deviations from modeled antenna-hat combinations increases with the number of spokes and the increasing size of the hat spoke material. However, the method is accurate to within about 5% of the modeled hat size at the extremes of the matrix marked by the frequency range and the hat material range. Over much of the matrix, deviations from modeled antennas is in the 1% range.
Accuracy of the calculations can be improved by introducing further "curve-fitting" correctives to the final determination of spoke lengths. They are omitted here, since my purpose has been to provide only initial guidance toward the development of detailed capacity-hat models.
Choice of NEC modeling parameters will, of course, vary the baseline of calibration. The models I used placed 25 segments in the main element so that their length was reasonably close the length of segments in the spokes and perimeter. Spokes used 3 segments each. Square perimeter sides used 5 segments, while hexagon and octagon perimeter sides used 3 segments.
The hat size calculations are only as accurate as the models, plus or minus the inherent error factors in the equations and the care of calibration. The methods we have looked at are not so much designed for lab precision as they are a convenient starting point for other tasks. One of those tasks is modeling a capacity hat antenna at a new frequency. Another is constructing a hat in the home ham shop. When used with due caution, the calculation technique used here may be adequate to both tasks.
The attached GW Basic listing provides a convenient utility program for starter calculations toward the construction of capacity hats of square, hexagon, and octagon configurations. Given the modifications of fundamental transmission-line analogy equations to produce the calibration, the values for characteristic impedance, capacitive reactance, capacitance, and standard disc size should be considered only as artifacts of the calculations, not as accurate values.
These investigations suggest that classic transmission-line analogy theory faces serious challenges if extended into the HF range, where the diameter of an antenna element is virtually always a quite significant percentage of the antenna height and the departure of the antenna shape from conical reduces the reliability of what careful theorists have always called an approximation, even at very low frequencies. The difficulty of calibrating classic calculations to method-of-moments models is a double hurdle, since neither method to this point provides a definitive baseline for the other. At best, the modifications to basic equations, gathered into the simple GW BASIC program accompanying these notes, can provide a rough guide to modeling efforts for capacity hat antennas in the 60� or longer range. The program returns results that are less than precise, but perhaps much better than a blind guess.2
                                             Appendix B

                                               Program

10 '           file "CAPHAT.BAS"  --  Compensated calculation of capcity-hat Zo equation with
        averaged results used to calculate hat spoke lengths
20 COLOR 11,1,3
30 CLS:LOCATE 1,12:PRINT"Calculation of Capacitive Hats for Vertical Antennas":LOCATE
        2,28:PRINT"L. B. Cebik, W4RNL"
40 PRINT:PRINT" The information requested yields approximations for spokes of open-frame hats
         with 4, 6, and 8 sides for common materials used by hams in the HF bands from"
50 PRINT" 3 to 30 MHz.  Spoke lengths are within about 5% of NEC-2 Models.":PRINT
60 '          Frequency selection
70 LOCATE 8,1:X$=STRING$(79,32):PRINT X$:LOCATE 8,1:INPUT" Enter the frequency of
        interest in MHz        ",F
80 FL=3:FH=30:IF FFH THEN 70 ELSE 90
90 LOCATE 8,1:X$=STRING$(79,32):PRINT X$:LOCATE 8,1:PRINT" Selected frequency in MHz
                          ";F
100 '          Antenna element diameter selection
110 LOCATE 9,1:PRINT" Select the letter by the main element diameter (in inches) closest to
        yours.":PRINT"  a.  0.50   b.  0.75   c.  1.00   d.  1.25   e.  1.50   f.  1.75   g.  2.00"
120 A$=INKEY$:IF A$="a" THEN 130 ELSE IF A$="b" THEN 140 ELSE IF A$="c" THEN 150
        ELSE IF A$="d" THEN 160 ELSE IF A$="e" THEN 170 ELSE IF A$="f" THEN 180 ELSE
        IF A$="g" THEN 190 ELSE 120
130 KL=.9688:KH=.953:D=.5:GOTO 200
140 KL=.9669:KH=.9483:D=.75:GOTO 200
150 KL=.9654:KH=.9445:D=1:GOTO 200
160 KL=.9641:KH=.9412:D=1.25:GOTO 200
170 KL=.963:KH=.9383:D=1.5:GOTO 200
180 KL=.962:KH=.9358:D=1.75:GOTO 200
190 KL=.9611:KH=.9335:D=2:GOTO 200
200 KV=(((F/3)-1)*.0333333)+.61:KQ=KH+((.4342945*LOG(FH/F))^KV)*(KL-KH):
        LK=KQ*245.8928:MQ=1/KQ
210 LOCATE 9,1:X$=STRING$(79,32):PRINT X$:LOCATE 9,1:PRINT" Selected main element
        diameter in inches     ";D
220 '          Open-frame hat wire or tubing diameter selection:  perimeter wire               assumed
        to have same diameter as spoke wire.
230 LOCATE 10,1:X$=STRING$(79,32):PRINT X$:LOCATE 10,1:PRINT" Select the letter by the
        material you plan to use for the capacity hat.":PRINT"  a. #12=.0808  b.#10=.1019  c.
        #8=.1285  d. .25   e. .50   f. .75   g. 1.00"
240 A$=INKEY$:IF A$="a" THEN 260 ELSE IF A$="b" THEN 290 ELSE IF A$="c" THEN 320
        ELSE IF A$="d" THEN 350 ELSE IF A$="e" THEN 380 ELSE IF A$="f" THEN 410 ELSE
        IF A$="g" THEN 440 ELSE 240
250 '          Calibration constants derived from models
260 KCL=1.2397:HKCL=1.1042:OKCL=1.0359
270 KCLS=2.1124:HKCLS=1.7032:OKCLS=1.483:KLC=.9745:KHC=.9664
280 DCAP=.0808:GOTO 470
290 KCL=1.2272:HKCL=1.0913:OKCL=1.0234
300 KCLS=2.0761:HKCLS=1.6726:OKCLS=1.4542:KLC=.974:KHC=.9652
310 DCAP=.1019:GOTO 470
320 KCL=1.2143:HKCL=1.078:OKCL=1.0106
330 KCLS=2.0385:HKCLS=1.6416:OKCLS=1.4312:KLC=.9732:KHC=.9639
340 DCAP=.1285:GOTO 470
350 KCL=1.1747:HKCL=1.0376:OKCL=.9723
360 KCLS=1.9122:HKCLS=1.5441:OKCLS=1.3508:KLC=.9713:KHC=.9593
370 DCAP=.25:GOTO 470
380 KCL=1.1276:HKCL=1.0037:OKCL=.9293
390 KCLS=1.7822:HKCLS=1.449:OKCLS=1.2625:KLC=.9688:KHC=.953
400 DCAP=.5:GOTO 470
410 KCL=1.096:HKCL=.9678:OKCL=.9028
420 KCLS=1.6889:HKCLS=1.3598:OKCLS=1.2007:KLC=.9669:KHC=.9483
430 DCAP=.75:GOTO 470
440 KCL=1.0707:HKCL=.9372:OKCL=.8831
450 KCLS=1.6244:HKCLS=1.3067:OKCLS=1.1576:KLC=.9654:KHC=.9445
460 DCAP=1!:GOTO 470
470 LOCATE 10,1:PRINT X$
480 LOCATE 10,1:PRINT" Selected hat material diameter in inches     ";DCAP
490 '          Antenna length selection between 60 and 85 electrical degrees
500 KV=(((F/3)-1)*.0333333)+.61:KR=KHC+((.4342945*LOG(FH/F))^KV)*(KLC-KHC)
510 KF=LK*12:KA=KF/90
520 HS=(KA*60)/F:HL=(KA*85)/F:HSF=HS/12:HLF=HL/12
530 LOCATE 11,1:PRINT X$:LOCATE 11,1:PRINT" For a frequency of";F;"MHz, a capacitive hat
        vertical should be between    ":PRINT"     ";HSF;"feet long and";HLF;"feet long."
540 INPUT" Enter the desired antenna length in feet      ",HF:IF HF>HLF OR HFnother run or uit?"
820 A$=INKEY$:IF A$="A" OR A$="a" THEN 30 ELSE IF A$="Q" OR A$="q" THEN END ELSE
        820
1. For further notes on correlating the antenna shortening factor to NEC-2 models, see "Calibrating K to NEC," QEX, 170 (March, 1996), 3-8.
2. A more accurate (and longer) version of the program included here is part of the HAMCALC collection compiled by George Murphy, VE3ERP.