


|
|
 |
 |
 |
|
|
Antentop is FREE e-magazine devoted to Antennas and Amateur Radio an
Special page devoted to
UA6AGW Antenna V. 20-10.51 (14.0- 29.5- MHz)

Custom Search
|
ANTENTOP- 01- 2016 # 020 |
UA6AGW Antenna V. 20-10.51 (14.0- 29.5- MHz) |
||
|
|
|||
|
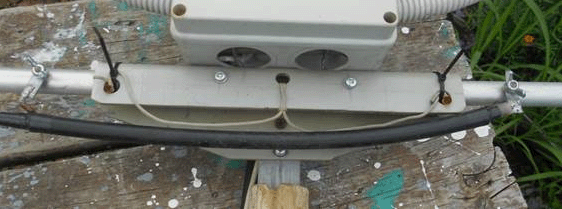
Inner tube was in 14- mm diameter
and outer tube was in 18- mm diameter. In folded position the
horizontal wire has length in 1.6- meter. Outer tube holds the
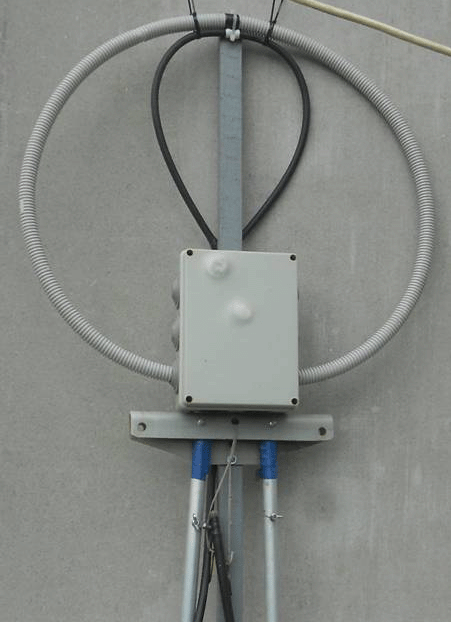
inner tube with help of a clamp. Figure 5 shows assembled UA6AGW Antenna V.
20-10.51. Figure
6 shows center (with a clamp) of the horizontal wire. Home brew "butterfly"
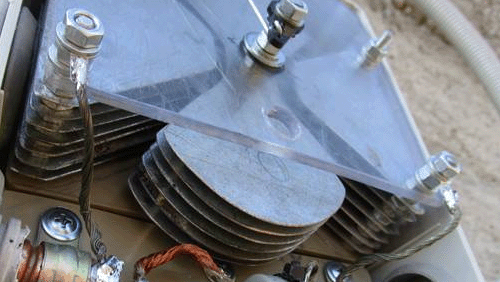
variable capacitor is used for tuning the antenna. Plates of the
capacitor made of galvanized iron in 0.5- mm thickness. Capacitor
has seven stator plates and six rotor plates. Bolts in 5.0- mm
diameter hold the plates. Spacer for the plates are nuts. Figure
7 shows the capacitor. Additional capacitor (for 20-
and 17- meter bands) made from a length of a coaxial cable. The
capacitor is connected to bridge to the variable capacitor. It
is easy to do because the connection points are accessible in
the field. Connection points are placed on the horizontal wires.
Figure
8 shows the additional capacitor. Capacitor is tuned with help of
servo motor HS-311
with standard hardware (Reference 3).
Figure
9 shows servo motor installed on to the variable capacitor.
To
operate the servo motor it was made a special control box. The
box was made on the base of China servo tester HJ (Reference 4).
Figure
10 shows the Control Box. Table on the box shows data
displayed on the servo tester to tune the capacitor for needed
band of operation. |
Figure
5 Assembled UA6AGW Antenna V. 20-10.51 |
||
|
Figure
7 Capacitor of the UA6AGW Antenna V. 20-10.51 |
Figure
8 Additional capacitor made of a length of coaxial cable |
||
|
At
the servo tester it was installed a big dial (instead a small
one) for the fine tune. Servo tester may be feed by 4.8- 6.0-
V. To feed the servo motor it was used a LAN cable between the
control box and those one. Coupling Loop made
of from 50- Ohm coaxial cable. Length of the coaxial cable to
be used for the coupling loop is 400- mm. Figure 11 shows the preparation of the coaxial cable for coupling
loop before it was formed to loop shape. Plastic from the length
of the coaxial cable is removed on to 10- mm in the center and
from two ends. Then braid of the coaxial cable is removed at the
center. Inner conductor is soldered to the braid at the far (right)
end of the length. |
Then the cable is
turned to loop. Far end of the length is soldered to the first
(left) side of the prepared cable. The coupling loop
is fastened to the upper part of the antenna's loop with help
of a Scotch and ties. Below there are several simple rules how to
install the coupling loop. At first, find on the antenna loop a point that is equidistance
from left and right side of the C2. It is the
point of symmetry of the antenna.
At second, find the point of symmetry of the coupling loop. The
coupling loop is mounted in the top of the antenna loop. Point
of symmetry of the coupling loop should concur with the point
of symmetry of the antenna. |
||
|
|
|
||
|
|
Page- 48 |
||
 |
 |
|
 |
Just for Fun:

Powered byIP2Location.com
Thanks for your time!
Last Updated:
January 4, 2020 16:05

