antentopSince2 July

** PLEASE DESCRIBE THIS IMAGE **


Antentop is FREE e-magazine devoted to Antennas and Amateur Radio an

Special page devoted to

Simple RF- Bridge: Design and Applications

Custom Search


ANTENTOP- 01- 2020, # 024

 Simple RF- Bridge: Design and Applications


It is very simple to use the device to test resistance on RF of the desired circuit. At first, it needs a source of RF power. It may be a QRP transmitter with power up to 5W. In this case the output of the transmitter is connected to connector J1- where a simple attenuator is installed. Alternatively, a low-power (100 to 300- mW) RF source, such as an HF signal generator, can be applied to connector J3.


RF- Bridge should be calibrated before measurements. For this:Apply RF power to the bridge at the open circuit at J2 and adjust potentiometer R9 so the meter M1 reads full scale.Connect resistors with known value to the connector J2.  Adjust R6 to meter M1 shows null. Mark the dial of the potentiometer R6 with the resistance. For example, connect 20 Ohm resistor, and mark dial for 20 Ohm, connect 30 Ohm resistor and mark dial for 30 Ohm, and so on.


Use resistors that work on HF, for example, use to metal film resistors and use possible low frequency for calibration, where the skin effect is not so significant. If you use an RF generator so do calibration at 100- kHz. If a QRP transceiver is used, do calibration at 1.8- MHz.


This RF- Bridge is intended for measurement of pure resistance. If the measurement circuit has some reactance the meter M1 will not go to the null, it will be at some shallow reading. The more the value of the shallow the more reactance has the measurement circuit. Of course it is significant lack of the RF- Bridge, but do not forget that is a very simple bridge and ever pricey (my lovely) MFJ – 259B shows pure reactance with reactance that has unknown- inductive or capacitive character. Anyway the RF- Bridge allows do lots measurements that may do suggestion about antenna input impedance and behavior of the RF cicuit.
So, connect antenna directly to the J2 and do measurement of the input impedance. If the antenna connected to the J2 via a coaxial cable the RF- Bridge shows the impedance of the antenna with influence on it the coaxial cable. However, the close the antenna input impedance to the wave impedance of the coaxial cable the less the influence on it the coaxial. Anyway the optimal way is do measurements straight away on the antenna terminals.  


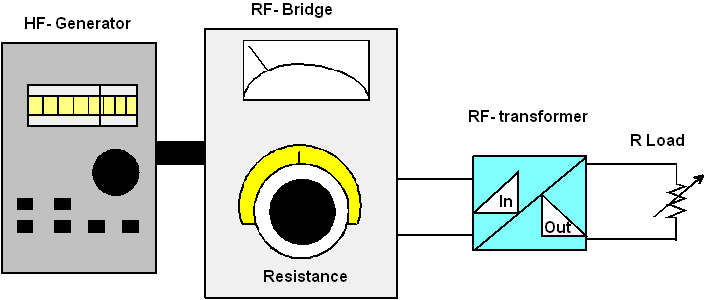
The RF- Bridge may be used for test any circuit at RF. For example, with the help of the RF bridge it is possible to test home brew and commercial RF transformers. Figure 2 shows schematic of the test.


Connect the RF transformer to the RF- Bridge. For example, connect 1/9 ratio (50/450 Ohm) RF transformer. Install dial of the RF bridge to the 50-Ohm. Connect to the transformer or resistor on 450-Ohm either good potentiometer that can work on RF. Install the potentiometer to the 450 Ohm. RF- Bridge should show zero reading. If it is not so, then play with potentiometer R6 of the RF- Bridge and with the load potentiometer of the tested RF transformer. After some manipulation it is possible find the parameters of the tested transformer.

 73! VA3ZNW


Figure 2 RF Transformer Under the Test


www.antentop.org

Page- 95


94 95


Just for Fun:

Map IP Address
Powered byIP2Location.com

Thanks for your time!

Last Updated:

April 26, 2020 12:57

** PLEASE DESCRIBE THIS IMAGE **

** PLEASE DESCRIBE THIS IMAGE **

2003entop